This is the fourth part of the eShopSupport Series which covers the details of the eShopSupport GitHub repository.
The Aspire Projects (AppHost and ServiceDefaults)
Unlike the other blog entries in this eShopSupport Series, this one is going to cover two projects in the solution: AppHost and ServiceDefaults - both are important for the Aspire local development experience. These projects are located under the src folder:
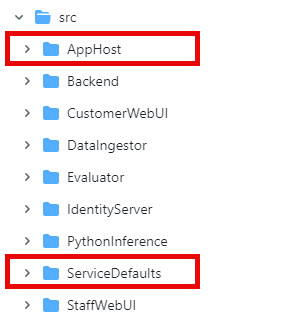
In this entry I’ll cover the details of how the AppHost and ServiceDefaults projects are used in the local development environment, a few things I found interesting and some thoughts on improvements.
What do these projects do?
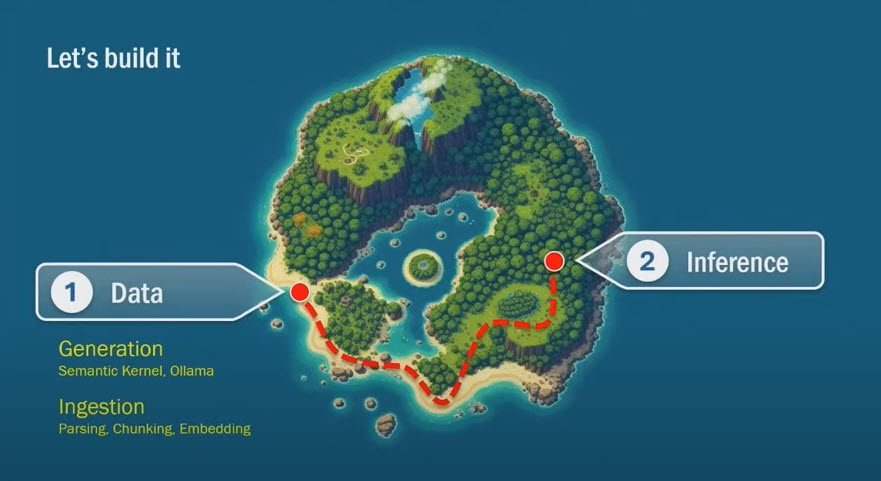
Steve Sanderson mentions Aspire around 27 minutes into his NDC talk “How to add genuinely useful AI to your webapp (not just chatbots)” as being an orchestration system that helps out when your application is many different executables. This is right before he gets into the “Inference” section:
Shortly afterward he starts up the AppHost and shows the Aspire dashboard listing the different resources in the solution:
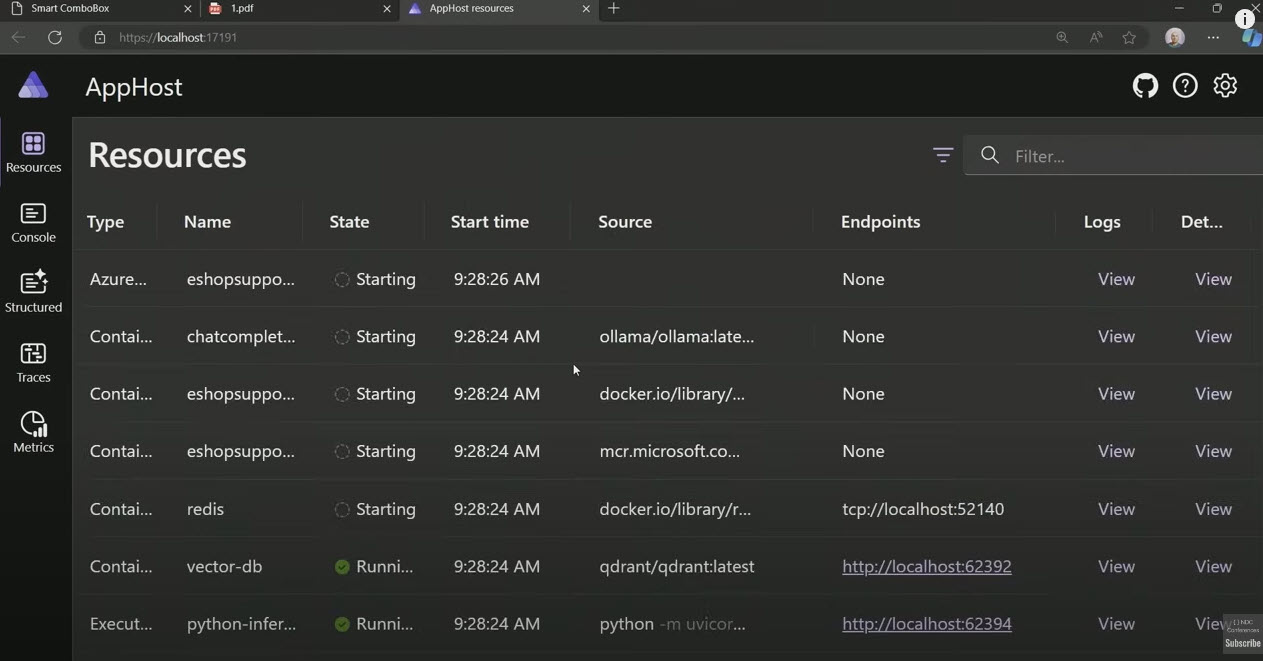
Since his presentation is about the practical applications of AI in applications, these Aspire projects are not explained in detail … so let’s look at these projects now.
What is Aspire?
The best resource I have found that explains what Aspire is in one resource, is a video by James Montemagno: Build Better Apps with .NET Aspire - Complete Beginner’s Guide & Tutorial. The video is just over an hour long. If you are not familiar with Aspire, I highly recommend you watch that video before continuing with this blog entry.
The eShopSupport solution contains these projects and resources:
Projects
| Name | Description |
|---|---|
| DataGenerator Project | Console application that generates data resources for the application |
| DataIngestor Project | Console application that processes the data generated by the DataGenerator |
| Evaluator Project | Console application that evaluates the accuracy of the chat API |
| AppHost and ServiceDefaults** Projects | Aspire projects used for local development resource orchestration and common abstractions for configurering projects |
| IdentityServer Project | ASP.NET Core web app for authentication and authorization of web UI projects and API |
| PythonInference Project | Uvicorn hosted FastAPI endpoint for running the sentence-transformers/all-MiniLM-L6-v2 model locally to classify text |
| Backend Project | API backend for the web UI projects |
| CustomerWebUI Project | Blazor web application for listing and creating customer support tickets |
| StaffWebUI Project | Blazor web application for working with customer support tickets |
| E2ETest Project | Playwright tests for StaffWebUI |
** The ServiceDefaults project is the only project that is not an application.
Resources
| Name | Description |
|---|---|
| PostgreSQL | Relational database used to store customers, product categories, products and tickets. Runs locally as a docker container with a data volume. |
| Qdrant | Vector database used to store projects and product manuals. Runs locally as a docker container with a data volume. |
| Blob storage | Blob storage for product manual files. Runs locally as a docker container with a data volume. |
| Ollama (optional) | Runs locally as a docker container with a data volume. |
| Redis | Runs locally as a docker container. |
Below is an architecture diagram from the eShopSupport’s Readme file:
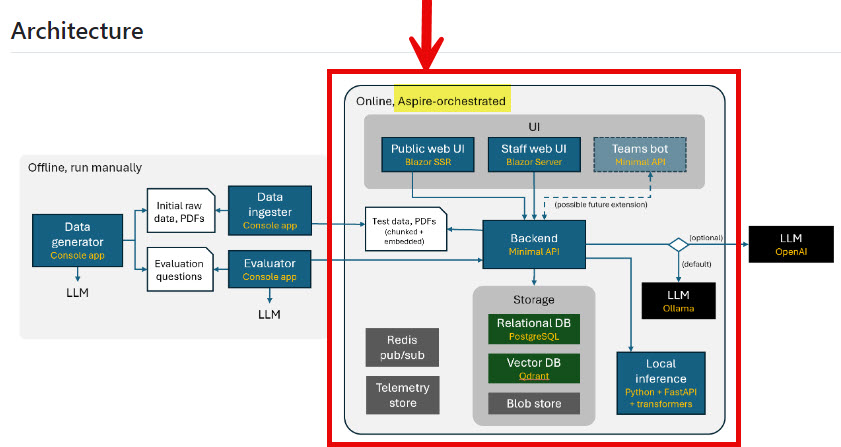
In order to run this application locally, you need to have the things in that red box start up. This means the AppHost, IdentityServer, PythonInference, Backend, CustomerWebUI and StaffWebUI projects AND all the docker containers listed above. This complex scenario is where Aspire comes in - it streamlines the local development scenario of multiple applications.
AppHost
The AppHost project is where the resources are configured (the documentation refers to this as defining the app model). This is done in the Program.cs file.
The following is the beginning of the app model creation using a call to DistributedApplication.CreateBuilder, then by optionally adding the appsettings.Local.json file to the configuration.
var builder = DistributedApplication.CreateBuilder(args);
builder.Configuration.Sources.Add(new JsonConfigurationSource { Path = "appsettings.Local.json", Optional = true });
A local variable is set for later on indicating of the application is being run by the E2ETest project.
var isE2ETest = builder.Configuration["E2E_TEST"] == "true";
Next a parameter is created to pass the eshopsupport-postgres resource a password from the appsettings.json file:
  "Parameters": {
    "PostgresPassword": "dev"
  }
The parameter is then used when the PostreSQL Aspire hosting is configured, which includes a PostgreSQL server resource and a PostgreSQL database resource:
var dbPassword = builder.AddParameter("PostgresPassword", secret: true);

var postgresServer = builder
    .AddPostgres("eshopsupport-postgres", password: dbPassword);
var backendDb = postgresServer
    .AddDatabase("backenddb");
Next the Qdrant resource is added:
var vectorDb = builder
    .AddQdrant("vector-db");
The Identity Server project is added and its https endpoint is retrieved to use later:
var identityServer = builder.AddProject<IdentityServer>("identity-server")
    .WithExternalHttpEndpoints();

var identityEndpoint = identityServer
    .GetEndpoint("https");
If you want to use Ollama to run the LLM locally, you need to indicate that in the appsettings.json file (you could also use the appsettings.Local.json file) by added a model name in the OllamaModel setting:
{
  // REMEMBER NOT TO COMMIT YOUR API KEYS TO SOURCE CONTROL
  // To reduce the risk, copy this file as appsettings.Local.json and make your changes there,
  // since that file overrides anything configured here and will be ignored by Git.
  //"ConnectionStrings": {
  //  "chatcompletion": "Endpoint=https://<azure openai resource>.azure.com/;Key=<key>;Deployment=chat"
  //}

  "OllamaModel": "mistral:latest",
}
The custom OllamaResourceExtensions is used to configure the model indicated in the config and add the resource to the app model. The container is configured with the model and indicator to use the GPU or not:
// Use this if you want to use Ollama
var chatCompletion = builder.AddOllama("chatcompletion").WithDataVolume();

// ... or use this if you want to use OpenAI (having also configured the API key in appsettings)
//var chatCompletion = builder.AddConnectionString("chatcompletion");
NOTE: if you do not want Ollama to use the GPU, there are a few changes you will need to make. Look at this issue for more detail: Add instructions for using this app on a system with no GPU
If you want to use Azure OpenAI, then you need to do this:
- Create your Azure OpenAI resource and create a deployment for you chat
- Uncomment the ConnetionStrings section in the appsettings.json (or appsettings.Local.json) file and include your Azure OpenAI settings:
  "ConnectionStrings": {
    "chatcompletion": "Endpoint=https://<azure openai resource>.azure.com/;Key=<key>;Deployment=<chat deployment name>"
  }
- Comment out the Ollama usage line and uncomment the OpenAI connection string line, like this:
// Use this if you want to use Ollama
//var chatCompletion = builder.AddOllama("chatcompletion", enableGpu: false).WithDataVolume();

// ... or use this if you want to use OpenAI (having also configured the API key in appsettings)
var chatCompletion = builder.AddConnectionString("chatcompletion");
That will change the chatcompletion to use the Azure OpenAI resource instead of Ollama.
The next resource configured is the blob storage. When you are running it locally it is going to use the storage emulator and a local container volume for storage:
var storage = builder.AddAzureStorage("eshopsupport-storage");
if (builder.Environment.IsDevelopment())
{
    storage.RunAsEmulator(r =>
    {
        if (!isE2ETest)
        {
            r.WithDataVolume();
        }

        r.WithImageTag("3.32.0"); // Temporary workaround for https://github.com/dotnet/aspire/issues/4646
    });
}
var blobStorage = storage.AddBlobs("eshopsupport-blobs");
The PythonInference project is manually configured using the PythonUvicornAppResourceBuilderExtensions to run the python project and map the api to the app model as an ExecutableResource.
var pythonInference = builder.AddPythonUvicornApp("python-inference",
    Path.Combine("..", "PythonInference"), port: 62394);
Redis is added to the app model to use for Web caching:
var redis = builder.AddRedis("redis");
The Backend project is configured with all the references to previous resources created, along with an environment variable for the IdentityUrl and the path to seed data files.
var backend = builder.AddProject<Backend>("backend")
    .WithReference(backendDb)
    .WithReference(chatCompletion)
    .WithReference(blobStorage)
    .WithReference(vectorDb)
    .WithReference(pythonInference)
    .WithReference(redis)
    .WithEnvironment("IdentityUrl", identityEndpoint)
    .WithEnvironment("ImportInitialDataDir", Path.Combine(builder.AppHostDirectory, "..", "..", "seeddata", isE2ETest ? "test" : "dev"));
Next is the StaffWebUI project, which takes the Backend project as a reference, asks for the http endpoints to be external and also sets an environment variable for the IdentityUrl:
var staffWebUi = builder.AddProject<StaffWebUI>("staffwebui")
    .WithExternalHttpEndpoints()
    .WithReference(backend)
    .WithReference(redis)
    .WithEnvironment("IdentityUrl", identityEndpoint);
The CustomerWebUI project is next and it only takes the Backend project as a reference and the environment variable for the IdentityUrl:
var customerWebUi = builder.AddProject<CustomerWebUI>("customerwebui")
    .WithReference(backend)
    .WithEnvironment("IdentityUrl", identityEndpoint);
The last project setup is for environment variables to be passed to the IdentityServer project:
// Circular references: IdentityServer needs to know the endpoints of the web UIs
identityServer
    .WithEnvironment("CustomerWebUIEndpoint", customerWebUi.GetEndpoint("https"))
    .WithEnvironment("StaffWebUIEndpoint", staffWebUi.GetEndpoint("https"));
The very last thing is to add a data volume to the PostgreSQL server and a volume to the Qdrant server for storage, if the AppHost isn’t being run by the end to end test.
All that configuration declares the app model, so we only need to have the AppHost project as the startup model in Visual Studio and Aspire will take care of the rest.
ServiceDefaults
The Aspire ServiceDefaults project is used to centralize shared logic like extension methods for telemetry, health checks and service discovery. You can read about the default provided extension methods in the documentation, I’m just going to mention the one that has a few changes in it.
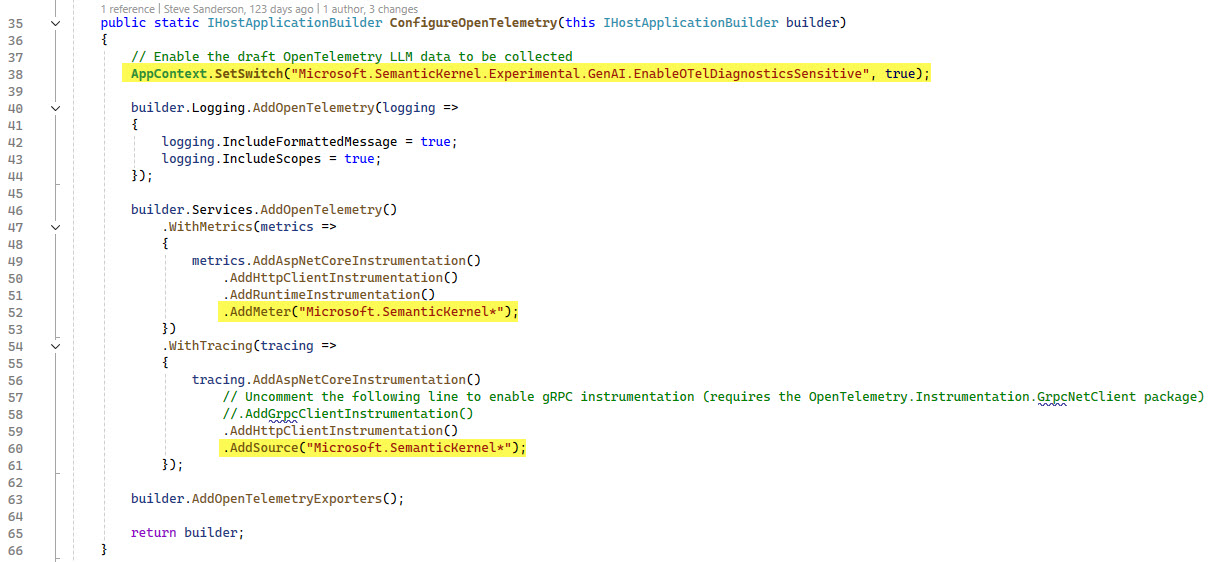
The ConfigureOpenTelemetry() method has three lines added to it for including SemanticKernel instrumentation. I have highlighted those lines below:
Clients
Since ServiceDefaults is a shared project, it makes sense the HttpClient wrappers are declared in this project too. There are four of them:
- CustomerBackendClient - provides an HttpClient wrapper for the customer related API calls.
- DevToolBackendClient - provides a preauthenticated HttpClient wrapper for the Evaluator project.
- StaffBackendClient - provides an HttpClient wrapper for API calls made by the StaffWebUI.
- PythonInferenceClient - provides an HttpClient wrapper for the
/classifyendpoint in the PythonInference project.
There are several classes under the ChatCompletion directory used for the E2E test running, which I’ll cover in a future blog post.
HttpClientExtensions has utility logic for adding authorization tokens.
QdrantHttpClientExtensions provides functionality to get an HttpClient wrapper configured to use Qdrant with Semantic Kernel’s QdrantMemoryStore.
Aspire dashboard
If you have not seen the Aspire Dashboard yet, this may be the reason you are looking for to start using Aspire with your own projects. It is an Open Telemetry dashboard for viewing the telemetry of your applications. There are five tabs: Resources, Console, Structured, Traces and Metrics.
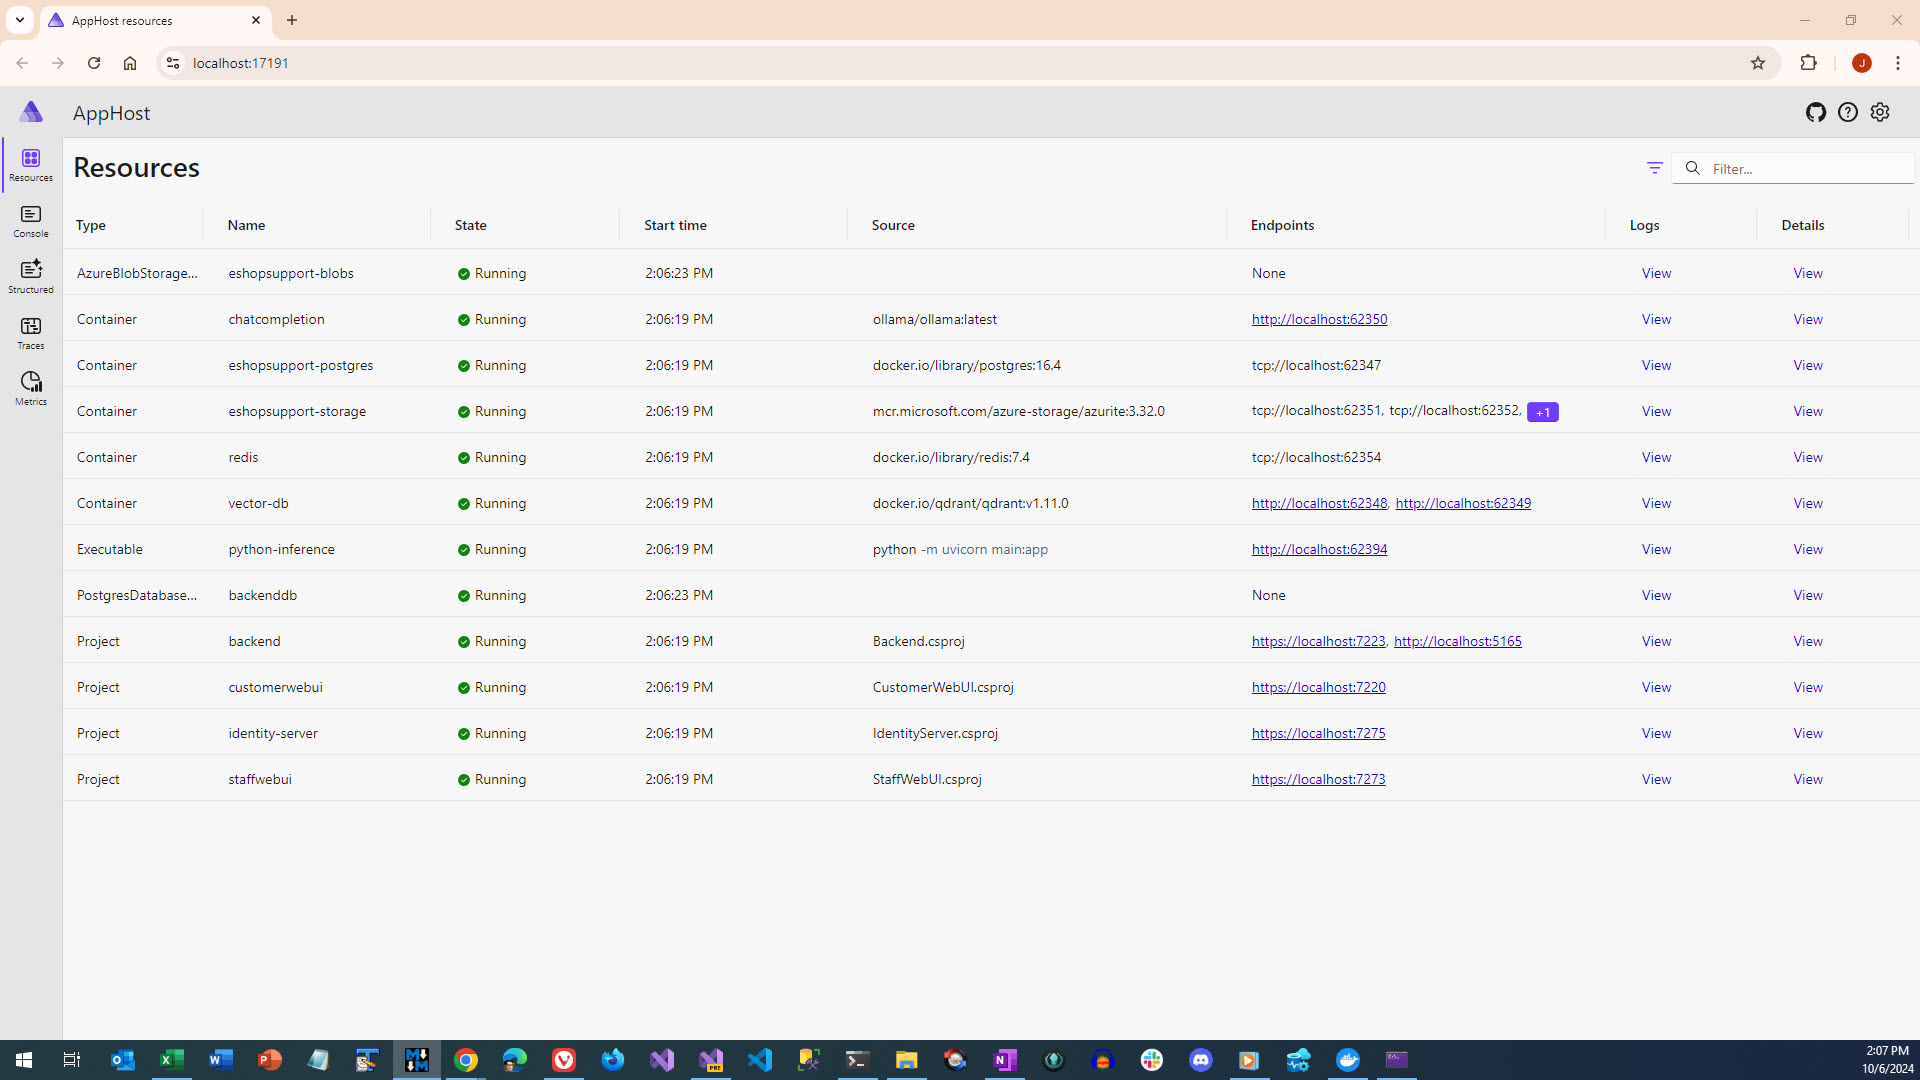
The resources tab shows the configured resources and provides links to their urls as well as links to view the logs and the details (including environment variables). This is useful for opening up browser tabs to the resources as well as troubleshooting environment variable configurations.
Resources
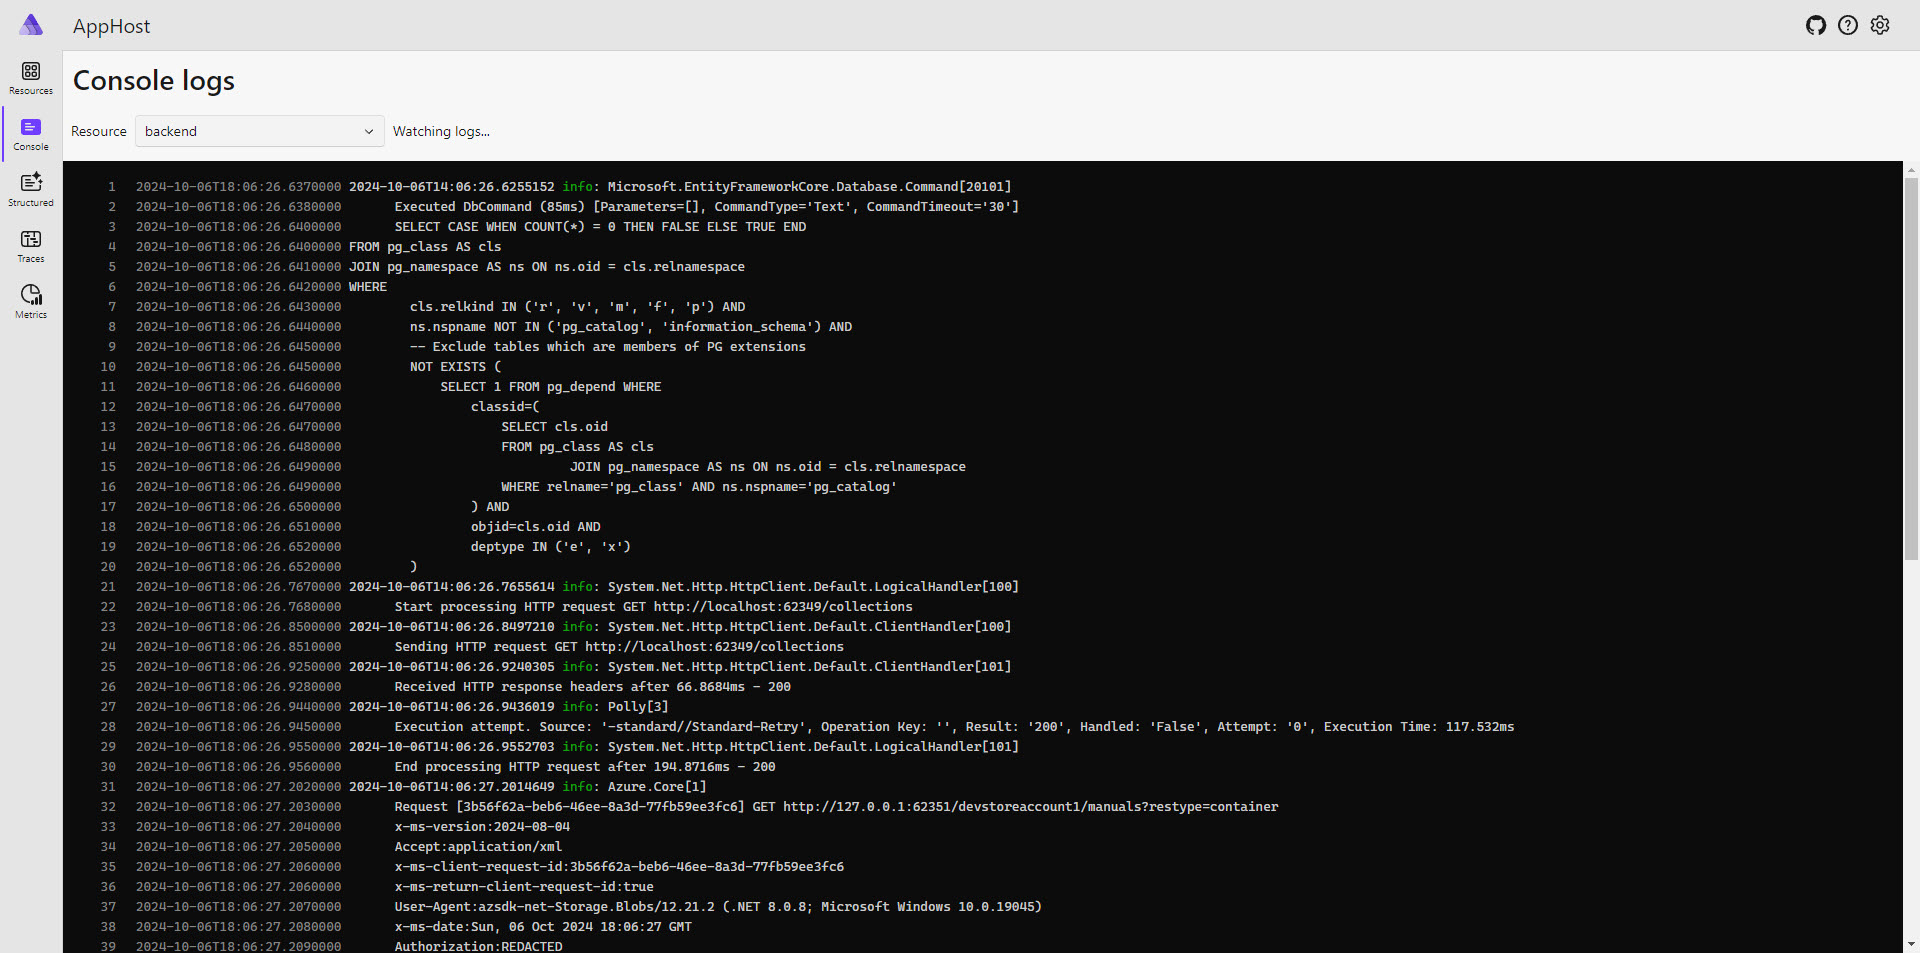
The Console tab (also reachable from the Logs View link on the resources tab), shows the different applications’ console output. You can use the dropdown in the upper left corner for changing the application to view.
Console
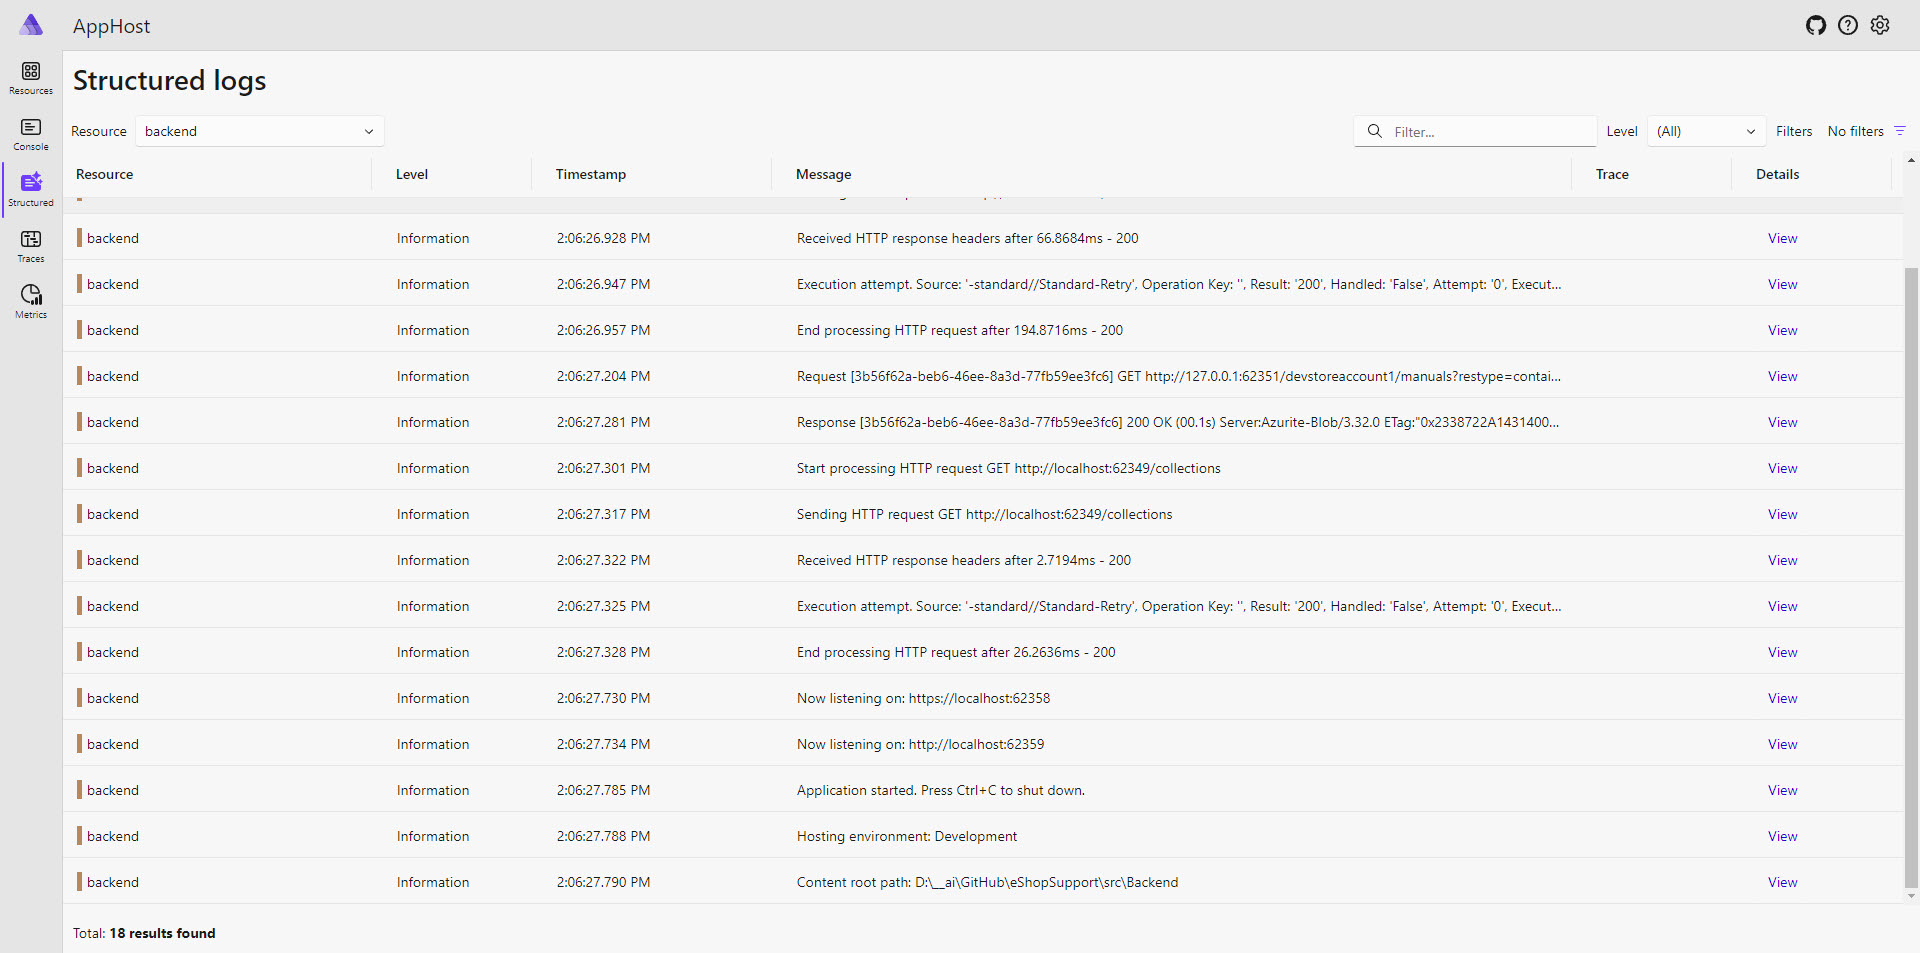
The Structured tab shows the structured logs and their detail. You can see the detail by either clicking on the row or the view link on the right.
Structured
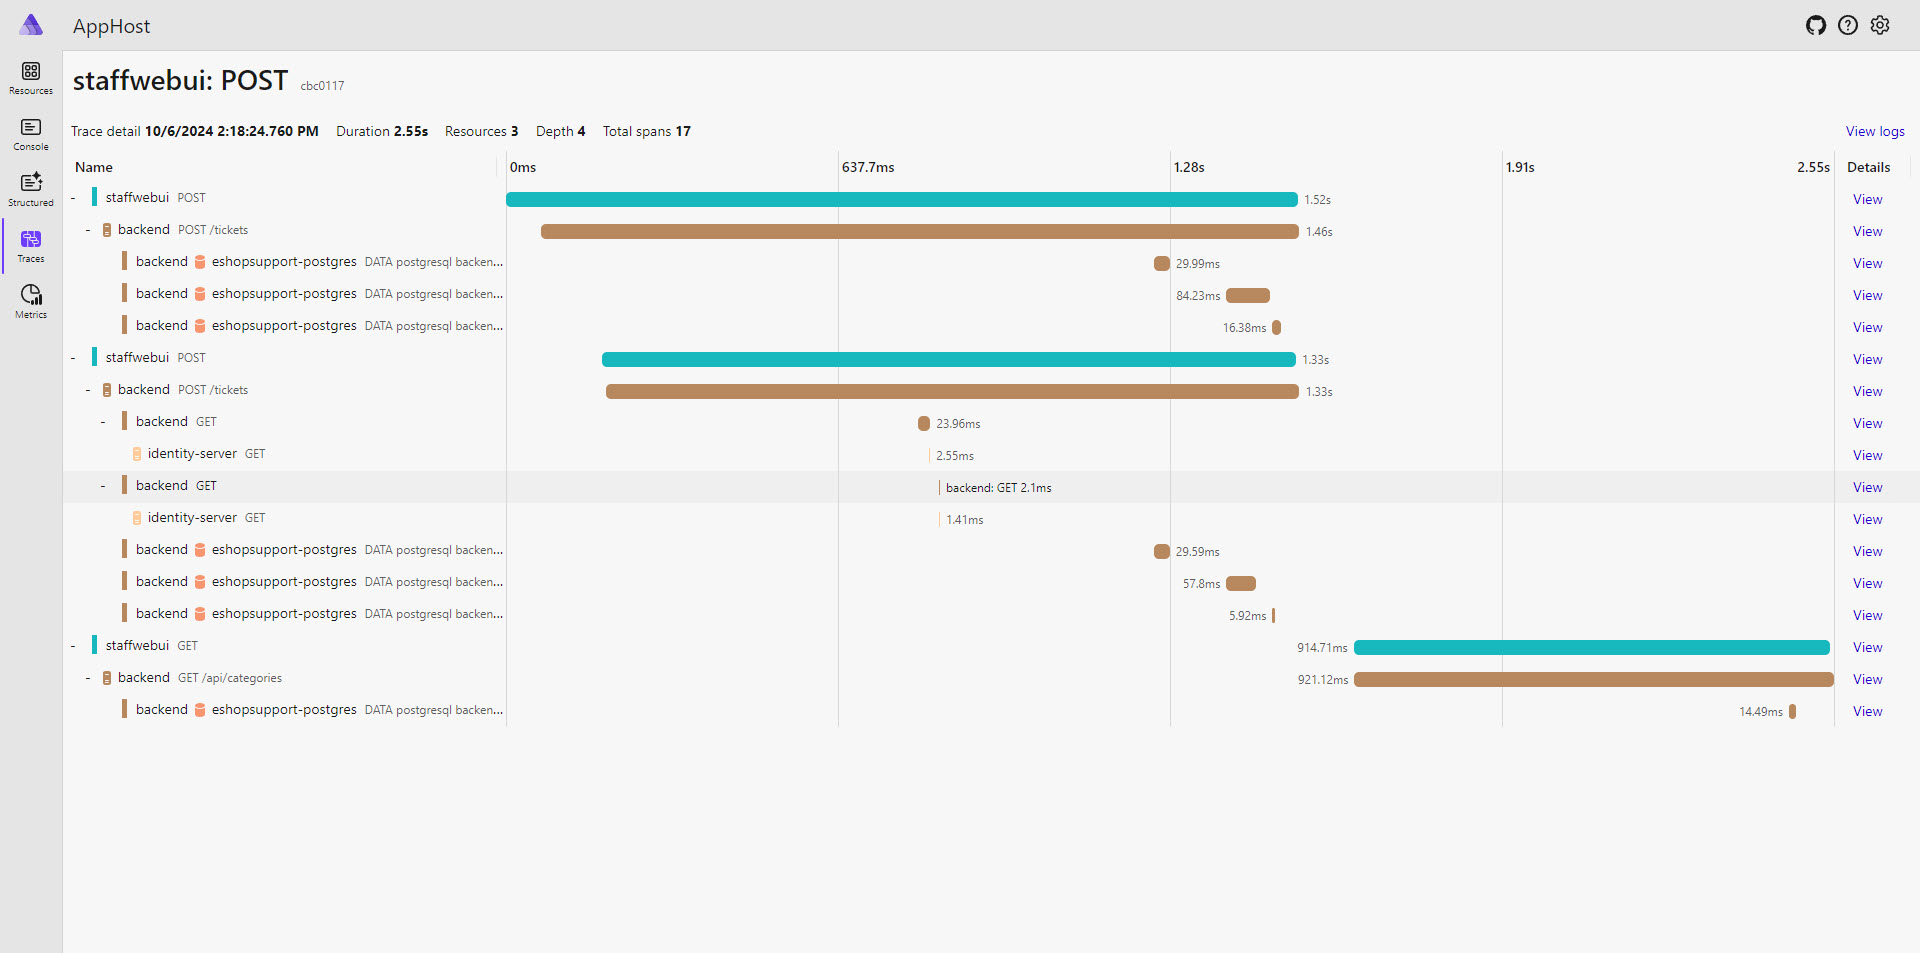
The Traces tab shows the listing of the activity in a given resource. You can change the resource with the dropdown in the upper left corner. If you want to see the waterfall view, just click on a row or the view link on the right.
Traces
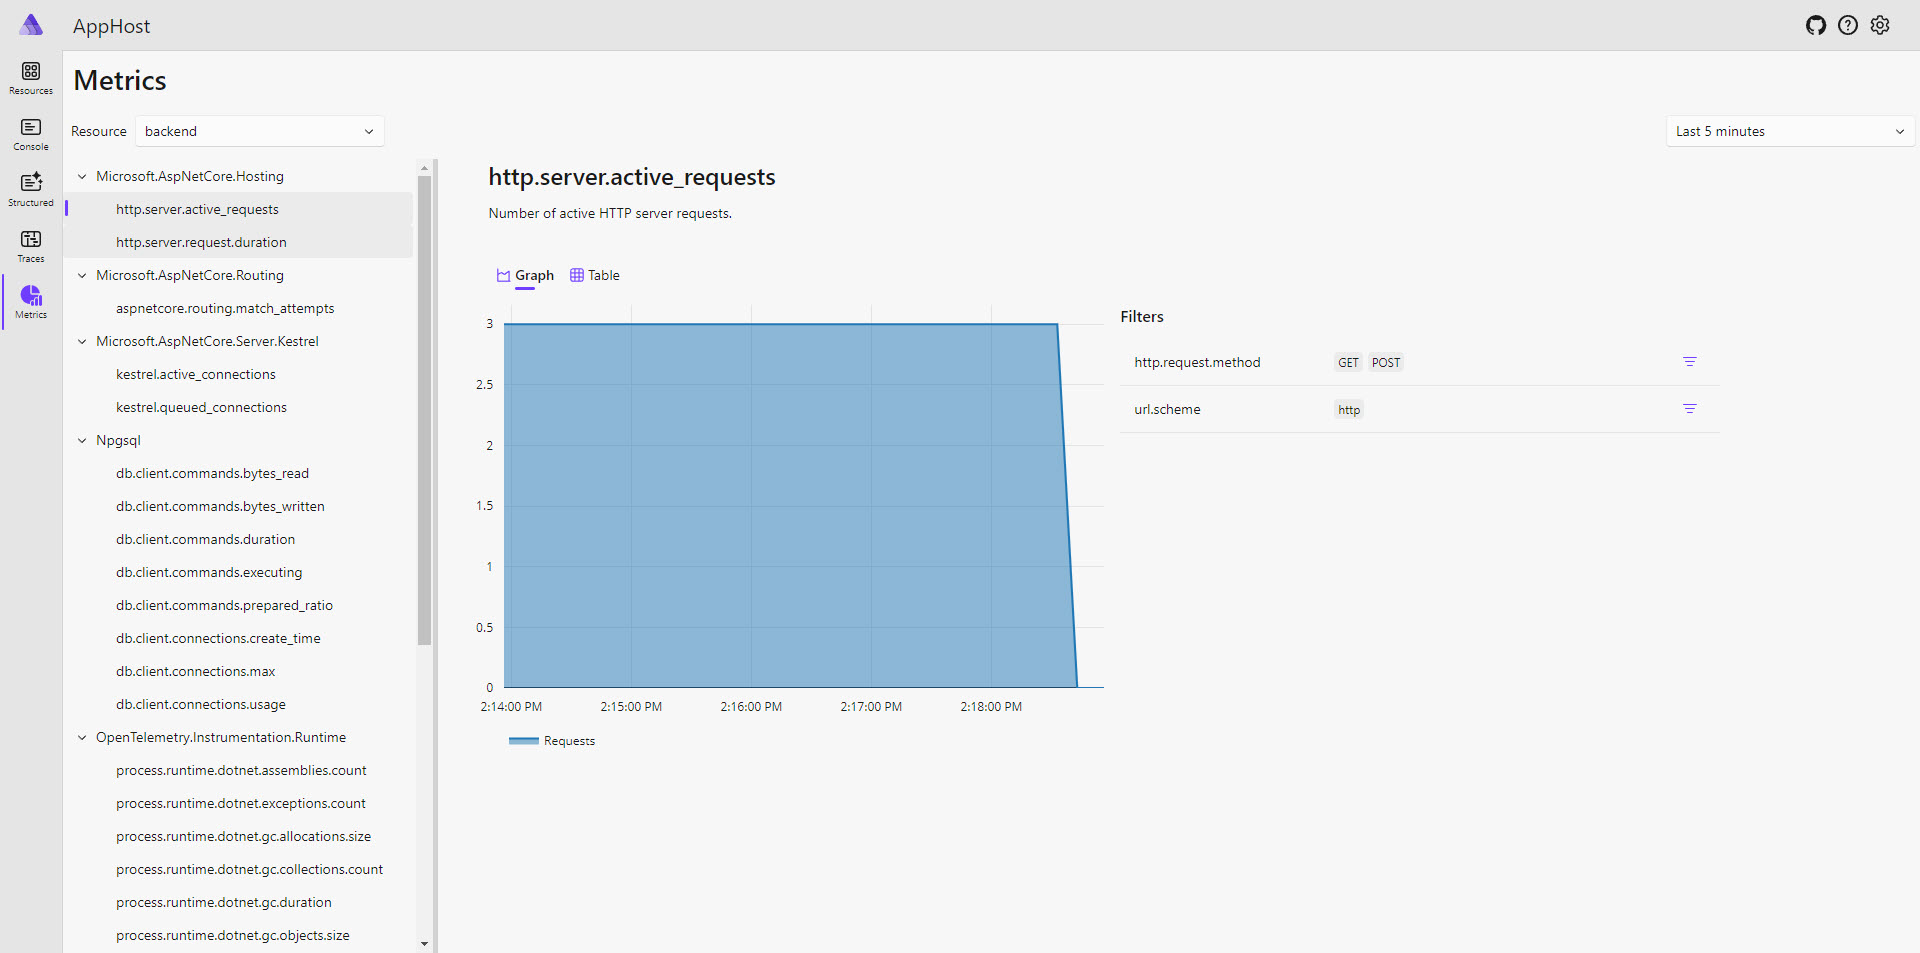
The Metrics tab shows the metrics for a given resource along with a nice chart to visualize the underlying data. Just choose the resource you want to look at with the dropdown in the upper left corner and select the metric you are interested in seeing.
Metrics
Dependencies
See the next section on How to set it up for the dependencies.
How to set it up
This is covered in the project’s readme file: and I recommend you read through it if you have not.
The highlevel view is:
- You need a GPU or otherwise read this issue
- Get the code
- Install Docker Desktop
- Install Python
- Install .NET 8 SDK
- Install .NET Aspire workload
- Install Python requirements
Points of Interest
These are some points in the code base that I found interesting and will be revisiting when writing my own code. These things are the reason I do these code review blog posts.
Aspire usage
Personally after learning about Aspire in this application, I am starting to use it in my own applications. The point of interest here is this application (eShopSupport) is a great example application for Aspire usage. I know this is something I will be referring to this codebase to in the future.
Aspire dashboard
The Aspire dashboard is really useful when developing. In working with eShopSupport I have found the ability to view the logging, traces and metrics super useful. I have several personal (and work related projects) that I am starting to explore whether or not I can move to Aspire - mainly for the dashboard.
HttpClientExtensions
I like the abstraction HttpClientExtensions.cs uses for adding a Bearer token to an HttpClient request.
        protected override async Task<HttpResponseMessage> SendAsync(HttpRequestMessage request, CancellationToken cancellationToken)
        {
            if (_httpContextAccessor.HttpContext is HttpContext context)
            {
                var accessToken = await context.GetTokenAsync("access_token");

                if (accessToken is not null)
                {
                    request.Headers.Authorization = new AuthenticationHeaderValue("Bearer", accessToken);
                }
            }

            return await base.SendAsync(request, cancellationToken);
        }
The AddAuthToken() extension syntax makes this a clean addition in my opinion:
builder.Services.AddHttpClient<CustomerBackendClient>(client =>
    client.BaseAddress = new Uri("http://backend/"))
    .AddAuthToken();
QdrantHttpClientExtensions
The QdrantHttpClientExtensions.cs has a nice abstraction and syntax for more complicated HttpClient configuration, which may come in useful to model at sometime.
    public static void AddQdrantHttpClient(this WebApplicationBuilder builder, string connectionName)
    {
        var connectionString = builder.Configuration.GetConnectionString($"{connectionName}_http");
        var connectionBuilder = new DbConnectionStringBuilder { ConnectionString = connectionString };
        var endpoint = new Uri((string)connectionBuilder["endpoint"]);
        var key = (string)connectionBuilder["key"];

        builder.Services.AddKeyedScoped(GetServiceKey(connectionName), (services, _) =>
        {
            var httpClient = services.GetRequiredService<HttpClient>();
            httpClient.BaseAddress = endpoint;
            httpClient.DefaultRequestHeaders.Add("api-key", key);
            return httpClient;
        });
    }

    public static HttpClient GetQdrantHttpClient(this IServiceProvider services, string connectionName)
        => services.GetRequiredKeyedService<HttpClient>(GetServiceKey(connectionName));

    private static string GetServiceKey(string connectionName) => $"{connectionName}_httpclient";
Thoughts on Improvements
This section is more or less to keep the same outline as I’ve used for the other eShopSupport blog entries - there is not much to improve on with these projects.
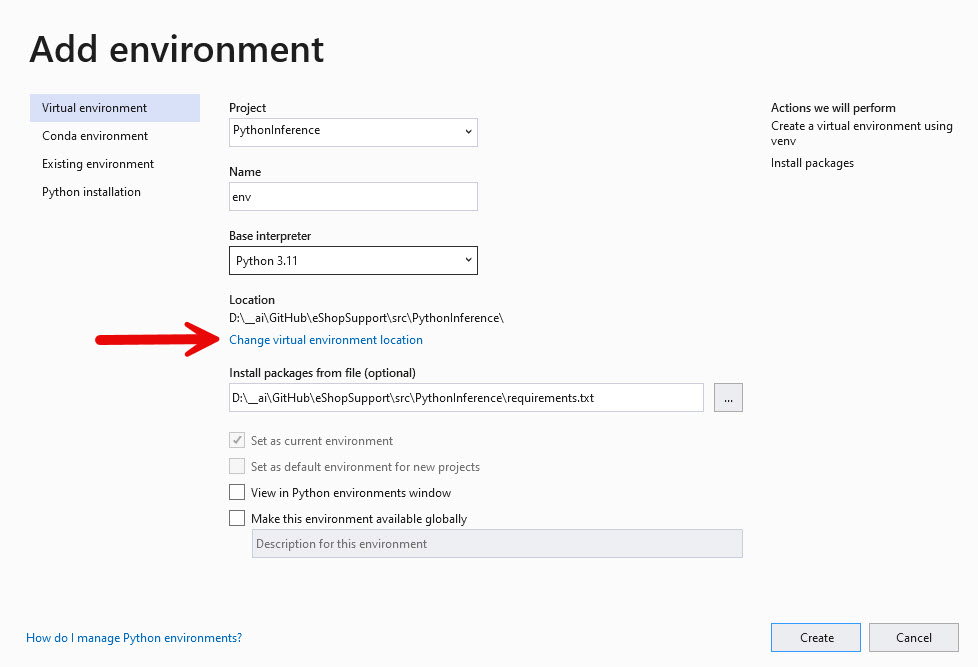
Python could use a virtual environment or container
This is more of a wishlist item, but it would be nice to have the default configuration of the PythonInference project be configured to use a virtual environment.
Other Resources
- eShopSupport Github
- How to add genuinely useful AI to your webapp (not just chatbots)
- .NET Aspire overview
- Build Better Apps with .NET Aspire - Complete Beginner’s Guide & Tutorial
- Aspire Dashboard
If you have a comment, please message me @haleyjason on twitter/X.