Demo Review: Chat Copilot
This is the fifth C# demo in The RAG Demo Chronicles (Blog Series) and has the most extensive use of Semantic Kernel out of all the demos I’ve reviewed.
The use of Retrieval Augmented Generation (RAG) is different with this project than the other demos I’ve reviewed - mainly because RAG is just one of its features.
With this demo, I also took the time to configure the optional authentication so I could play with the MS Graph plugin … and WOW! Just adding the web searcher and MS Graph plugin really make this a powerful demo app. It gives me a lot of ideas for my own projects.
Demo Details
| Item of Interest | As of 6/9/2024 |
|---|---|
| Number of Contributors: | 45 |
| Date repo created: | 4/2/2023 |
| Update within last month: | Yes |
| Link to documentation: | Microsoft Learn Page |
| Github project link: | https://github.com/microsoft/chat-copilot |
| Watching: | 40 |
| Forks: | 634 |
| Stars: | 1.9k |
| Knowledge needed to use: | C# Azure services |
| Prerequisites to get demo working: | Run local or Azure account Access to OpenAI or Azure OpenAI (apply here) If you follow my instructions below you’ll need: Git Azure CLI Powershell 7 Yarn |
| Knowledge would be helpful but not required: | React Azure services below Open AI APIs |
| Technologies Used: | ASP.NET 8 C# SignalR React Azure Web Apps Azure Cosmos DB Azure OpenAI Azure Storage Azure AI Search Entra ID/AAD Semantic Kernel Kernel Memory |
Demo Description
This demo is a React web application frontend with a ASP.NET 8 backend. There are also a couple of optional projects you can use: a WebSearcher function app and CopilotChatMemoryPipeline web application (used for processing files and memory). When you run it locally, it can use the file system for storage, otherwise when you deploy it to Azure there are several resources that are used for storing chat history, files, memory, etc. - which are mentioned later in this review.
A look at the User Interface (UI)
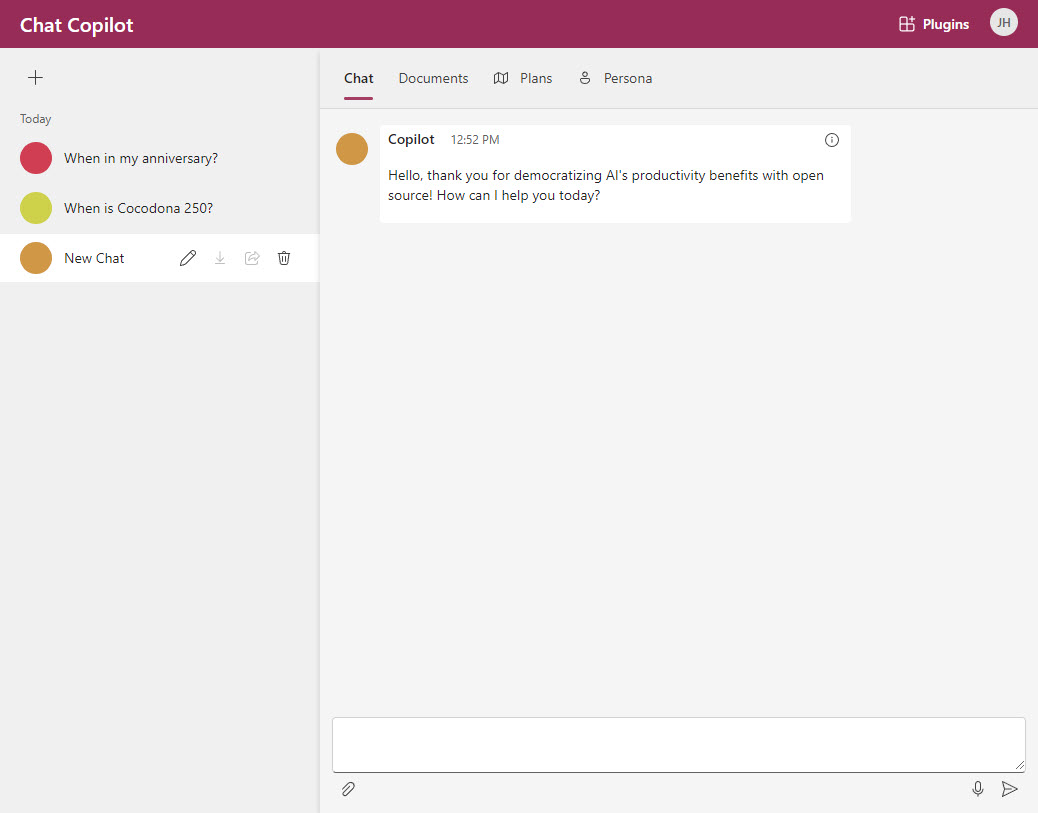
Unlike the other demos I’ve reviewed, out of the box there is no data preloaded - this project is a blank canvas (other than the system prompt - which you can change). When you deploy it to Azure, by default the chat history is saved in a CosmosDB and reloaded when you login the next time.
The left panel shows a list of past conversations saved in CosmosDB. There is also a button to create a new chat. If you click the + button in the upper left corner and select New Chat Session it will create a new chat. Once you’ve asked a question, it will be the default name of the conversation. You can change the name using the pencil icon in the conversation listing. You can also delete a conversation by clicking on the trash can icon.
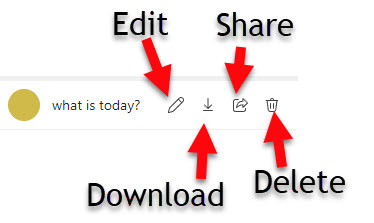
There are two other features in the conversation listing that aren’t on by default: Download chat session and Share live chat code.
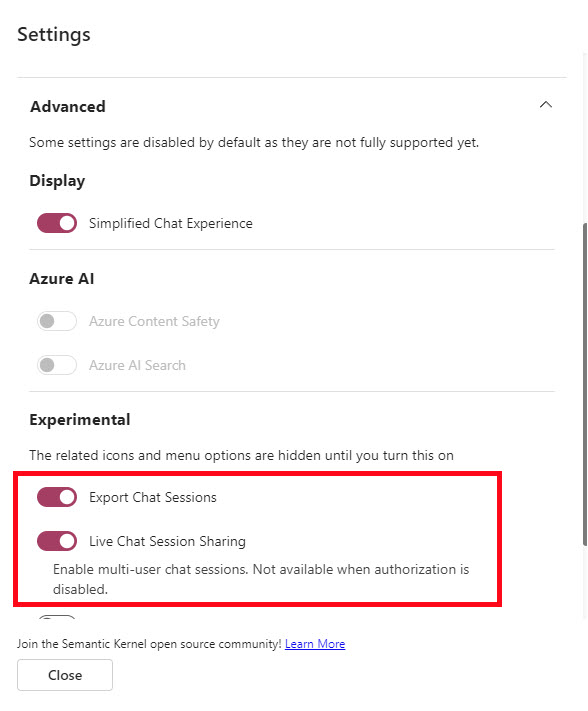
You can enable these two features in the settings dialog by doing the following:
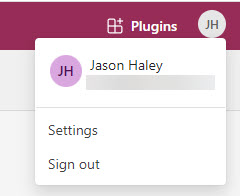
- Click on the user initials icon in the upper right corner and click on Settings:
- Expand the Advanced section and find the Experimental subsection in the settings dialog and enable the Export Chat Sessions and Live Chat Session Sharing.
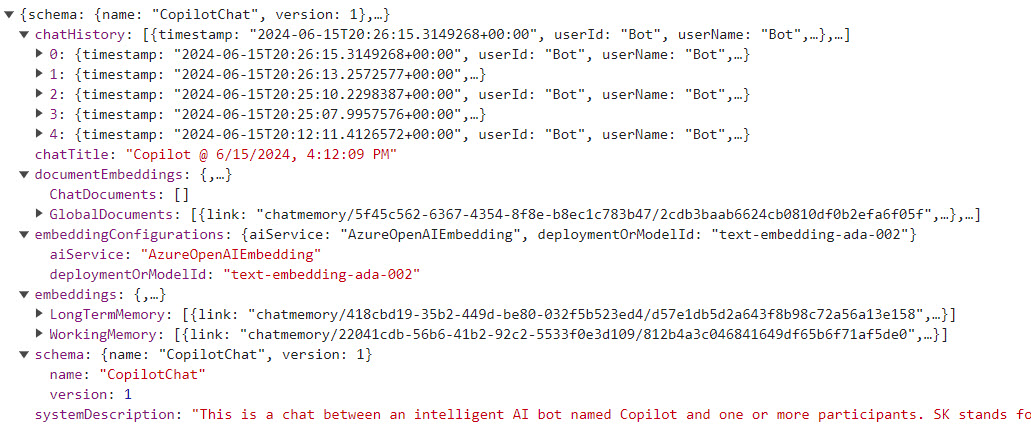
If you click on the Export Chat Sessions, you will download a JSON file of the current chat session. The file has all the chat history, document embeddings, embedding configurations, embeddings (long term and working memory) and the system message for the current session.
If you click on the Share Live Chat Code, you’ll get a dialog with a code you can share with others to join the chat session.
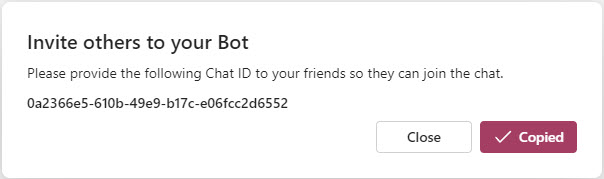
If you give that code to a fried and have them go to the site, they’ll need to login (you can only use this feature when authentication is configured):
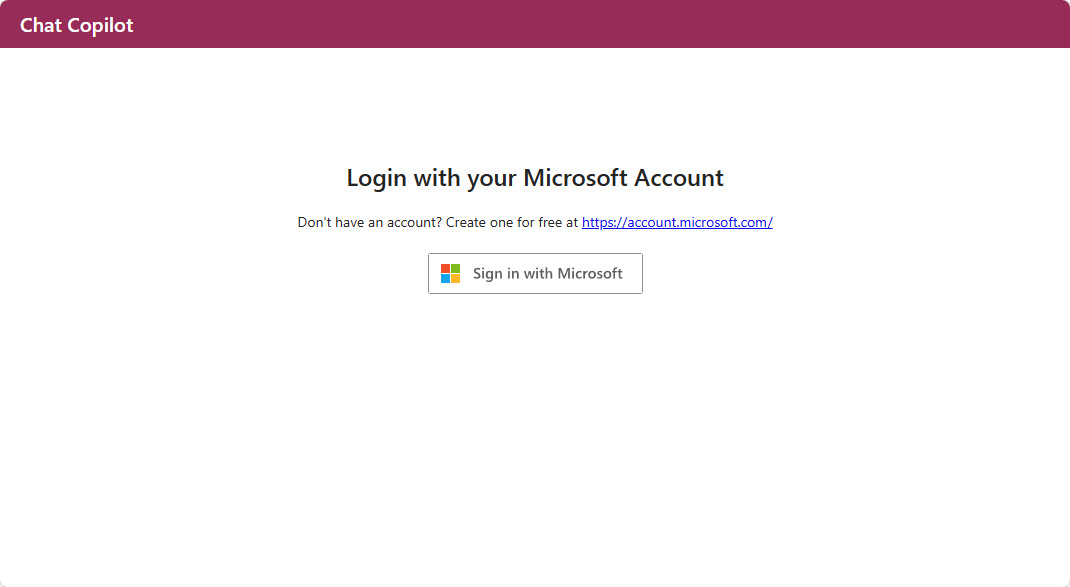
NOTE: that user will also need to turn on the experimental feature switches in order to join a shared chat
Once logged in and they have the experimental feature Live Chat Session Sharing on, they can then click the plus sign in the upper left corner and choose Join Shared Chat.
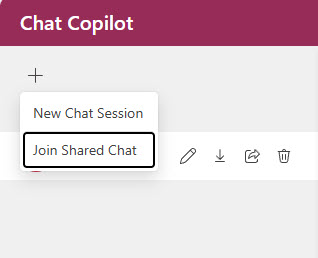
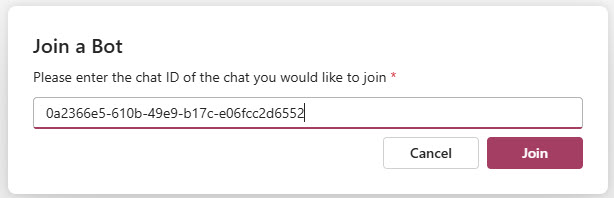
That menu option will open a dialog for them to enter that shared code and click the Join button:
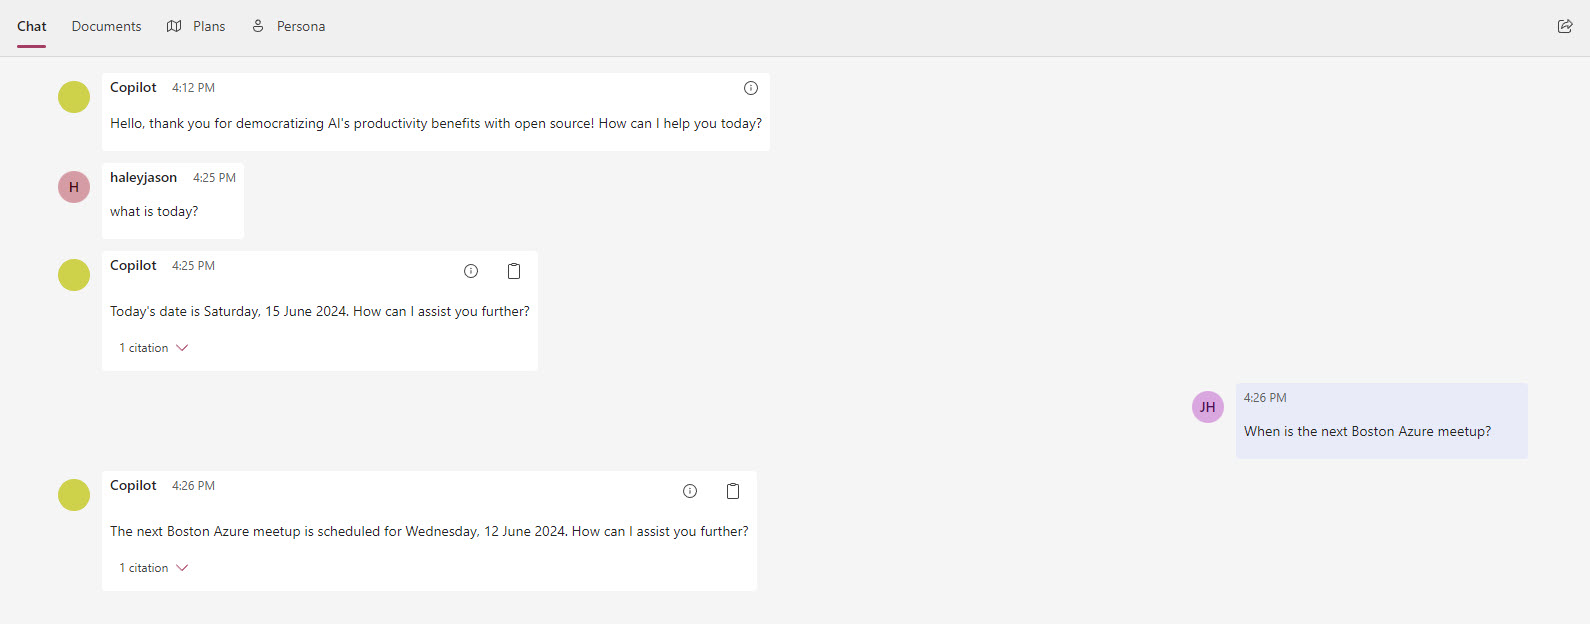
All users will now have access to the shared chat and see all the messages in the session.
Other functionality on the Chat tab
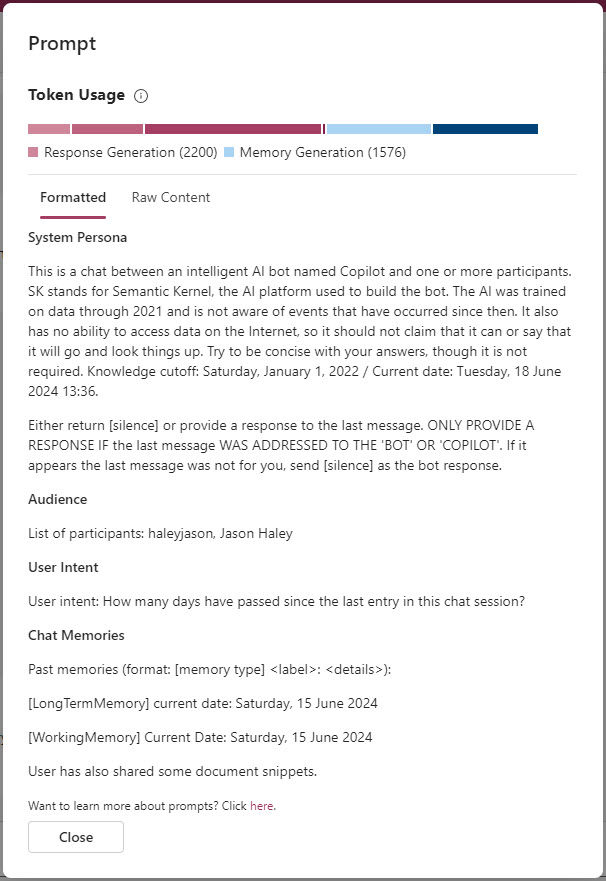
On the responses from the system there are two icons that indicate their usage if you hover over them: show prompt and copy text.
If you click on the show prompt icon, you will get a dialog that shows the detail (formatted and raw content) of the prompt and the token sizes of the parts of the prompt.
If you click on the copy text, the text in the block will be copied to the clipboard.
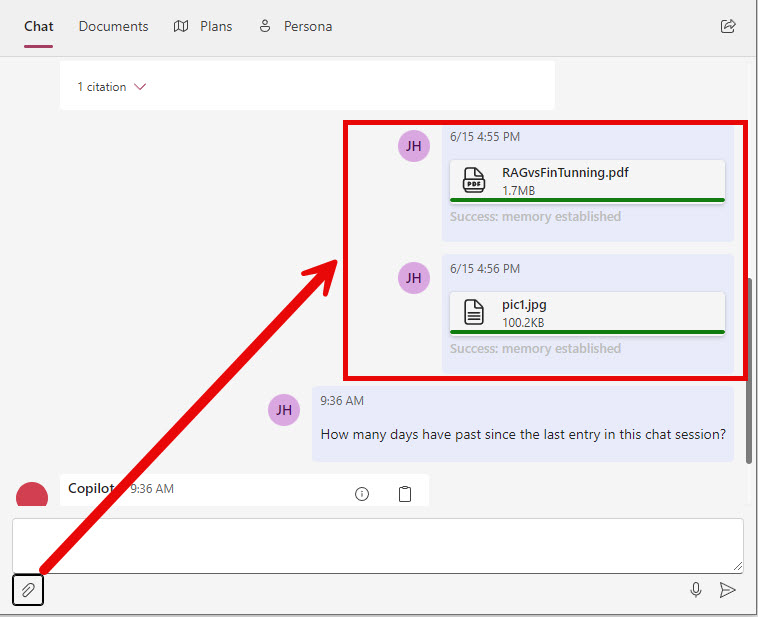
You can also upload documents to the chat by clicking the paperclip icon below the chat input box. The files will get chunked and embeddings will be retrieved after they are uploaded. When you add files on the Chat tab they are added to the session specifically and won’t be available on other chat sessions.
Documents tab
If you select the Documents tab, you will see the list of documents that have been added to the current chat session or added globally (available to all sessions).
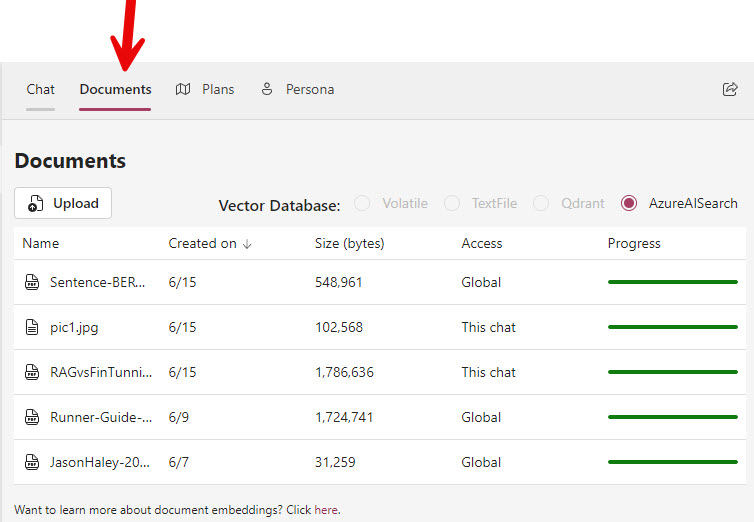
If you click on the Upload button you will get a menu to choose New local chat document or New global document. From what I can tell, the difference is: the local chat version is only used for the single chat session and the global document will be there for all chat sessions.
You can also see where the documents (stored in chunks and with their embeddings) are being stored. When running locally it will usually be the TextFile choice, but when deployed to Azure it is the AzureAISearch choice.
NOTE: When running it locally, the files will show under the tmp folder at the project root directory.
One drawback is the size limit default is only 4MB, but it can be changed in the appsettings.json file.
  "DocumentMemory": {
    "DocumentLineSplitMaxTokens": 72,
    "DocumentChunkMaxTokens": 512,
    "FileSizeLimit": 4000000,
    "FileCountLimit": 10
  },
Plans tab
As of 6/18/2024, the documentation mentions there at two planners … however it looks like the Planner section in the appsettings.json file was removed in this PR: Upgrade to Semantic Kernel 1.4 in February 2024. I have not seen anything show under the Plans tab when playing around with it, so I think it is obsolete and not used anymore.
Persona tab
The Persona tab is where you can change the system/meta prompt, however it is only changed for the current session:
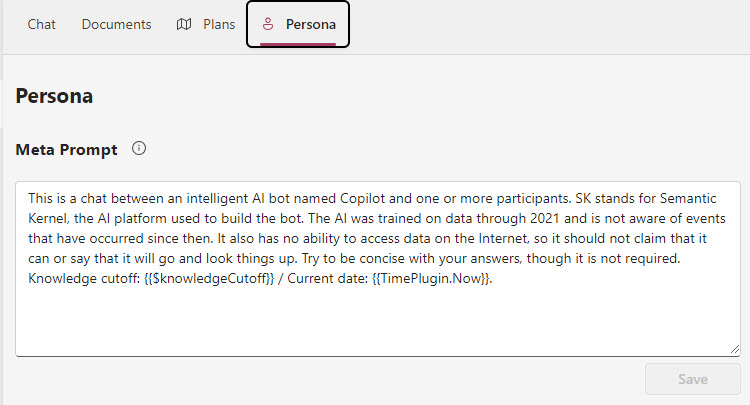
In order to change the prompt permanently you need to change the appsettings.json file:
"Prompts": {
  "CompletionTokenLimit": 4096,
  "ResponseTokenLimit": 1024,
  "SystemDescription": "This is a chat between an intelligent AI bot named Copilot and one or more participants. SK stands for Semantic Kernel, the AI platform used to build the bot. The AI was trained on data through 2021 and is not aware of events that have occurred since then. It also has no ability to access data on the Internet, so it should not claim that it can or say that it will go and look things up. Try to be concise with your answers, though it is not required. Knowledge cutoff: {{$knowledgeCutoff}} / Current date: {{TimePlugin.Now}}.",

  // other prompts

}
There is also Short Term Memory, Long Term Memory and Memory Bias:
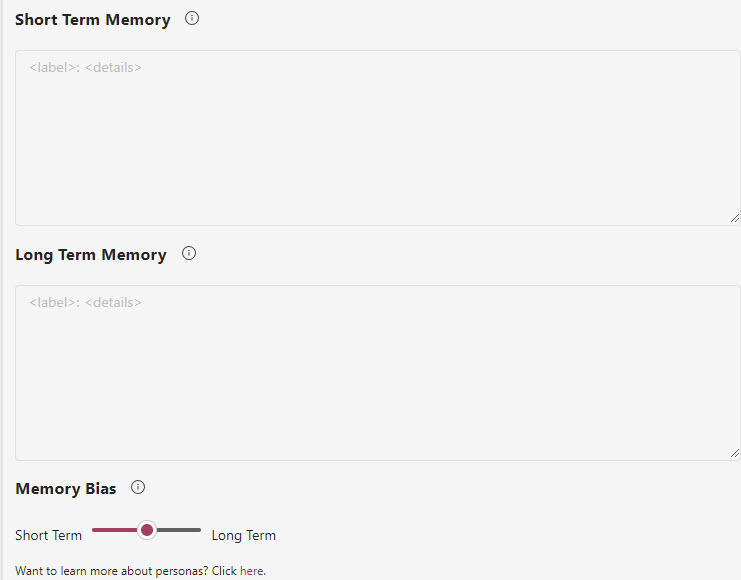
The UI code has the Short Term Memory and Long Term Memory controls hardcoded to not be editable, so you can’t do anything with them. The Memory Bias does seem to allow you to modify the bias toward either short or long term memory. The value is between 0 and 1 and in the code is called MemoryBalance. The SemanticMemoryRetriever uses it in the CalculateRelevanceThreshold method to come up with a value that is passed to Kernel Memory for the minimum cosine similarity value when searching memory (which includes the documents).
A look at the Backend
The backend API project is the CopilotChatWebApi project which has the following endpoints used to provide functionality to the UI:
| Method | URL | Description |
|---|---|---|
| GET | /authConfig | Returns the JSON authentication setup information (after you’ve followed the setup instructions) |
| GET | /chats | Gets all the saved chat sessions from CosmosDB for the logged in user. |
| POST | /chats | Creates a new chat session using the InitialBotMessage in the Prompts section of the appsettings.json file and saves it to CosmosDB. |
| PATCH | /chats/{chatId} | This updates the chat session for the given chatId. Only happens when the title, system prompt or memory balance are changed. |
| GET | /chats/{chatId} | Gets a chat session for the given chatId. |
| DELETE | /chats/{chatId} | Deletes the chat session for the given chatId and entries in CosmosDB for participants, messages, memory sources as well as removal of any documents connected to the chatId. |
| GET | /chats/{chatId}/archive | Builds and returns the chat session JSON export file for the given chatId. |
| GET | /chats/{chatId}/documents | Gets a list of documents connected to the chat. |
| GET | /chats/{chatId}/memories | Uses Kernel Memory to get any memories connected to the chat. |
| POST | /chats/{chatId}/messages | Registers plugins/functions and invokes the kernel to get a response. |
| GET | /chats/{chatId}/messages | Gets an ordered list of messages connected to the given chatId session. |
| POST | /chats/{chatId}/participants | Connects a logged in user to a chat session. |
| GET | /chats/{chatId}/participants | Gets a list of all participants in a chat session. |
| PUT | /chats/{chatId}/plugins/{pluginName}/{enabled} | Sets if a plugin is enabled or not for the give chatId. |
| POST | /chats/{chatId}/documents | Uploads a document for a chat session. |
| POST | /documents | Uploads a document for all sessions (global) |
| GET | /info | Returns JSON indicating the available plugins and configured memory store for the system. |
| GET | /maintenanceStatus | This looks like a placeholder and only returns a 200 |
| GET | /pluginManifests | Gets the plugin manifext for the Hosted Plugins (by default it is only the Klarna Shopping plugin) |
| GET | /speechToken | When you’ve deployed it to Azure, this returns the speech token for the Azure Speech service |
Before getting to the details of the backend logic, lets look at some of the Azure services being used.
Cosmos DB
CosmosDB is used for storing the chat sessions. It uses four containers:
| Name | Description |
|---|---|
| chatsessions | This hold the metadata about the chat session (such as system prompt, memory balance, title, enabled plugins. |
| chatparticipants | This is a userId and chatId pair. |
| chatmemorysources | This is where uploaded documents are connected to a chatId. If it is a global document, then an empty guid is used as the chatId. |
| chatmessages | This is the history of a chat session and file uploads. |
Azure AI Search
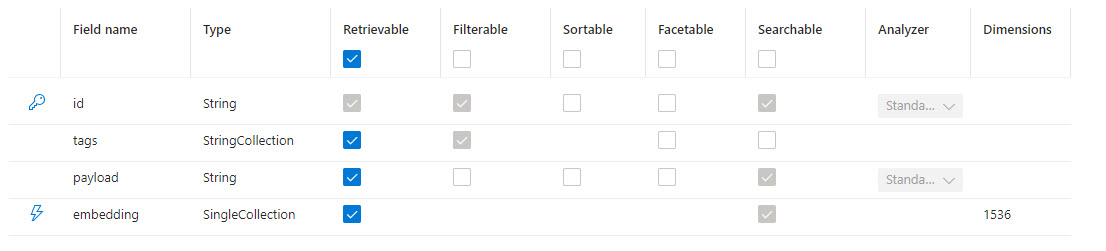
Azure Search AI access is part of the Kernel Memory functionality and not surfaced directly in the application. There is only one index created: chatmemory. Out of the box, it will be empty (unlike the other demos I’ve reviewed).
chatmemory
The fields in the index represent the properties on the AzureAISearchMemoryRecord in Kernel Memory.
Storage
The storage access is also part of Kernel Memory functionality and not surfaced directly in the application. Since I’m not digging into the details of Kernel Memory here I just want to call out the resources and a little about their usage in the system.
Blob storage
Blob storage is used by Kernel Memory to save document chunks. The container chatmemory is where the blobs are kept.
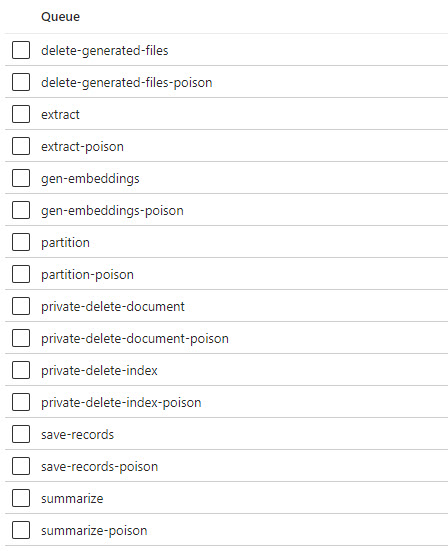
Queues
Queues are used to by Kernel Memory to communicate and drive the “pipeline” for processing files. Documents go through four steps: extract, partition, gen_embeddings, and save_records. There are poison queues for each queue used. I’m not 100% all the queues are used in the application, it would take a deep dive into how Kernel Memory works to figure that out.
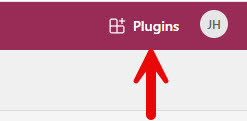
Plugins
One of the unique features of Chat Copilot is its ability to add in plugins at runtime. If you click on the Plugins link in the upper right corner, you’ll get the dialog. Initially these plugins were like OpenAI plugins - however OpenAI has moved away from their plugins toward the CustomGPTs.
There are four plugins added by default and the WebSearcher plugin is available as an optional installation (which uses a Bing Search Azure resource and Function App to host it).
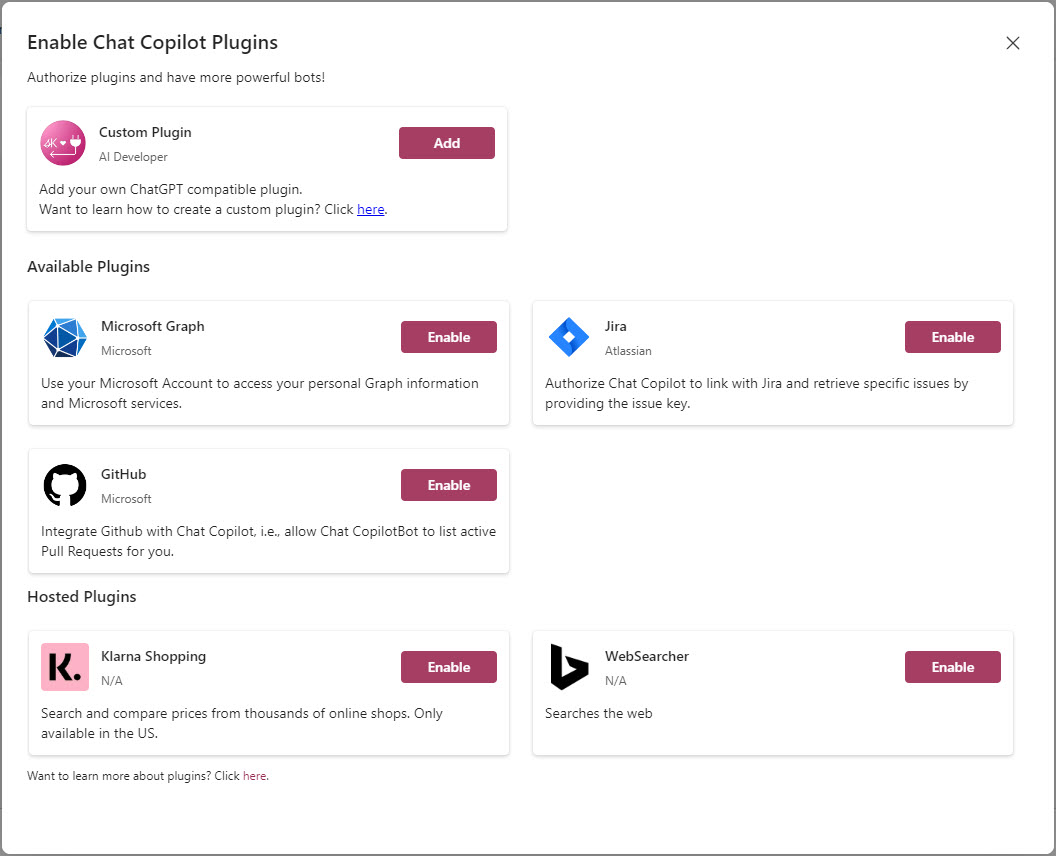
I haven’t configured all the plugins, but I do want to cover two of them that I have found useful.
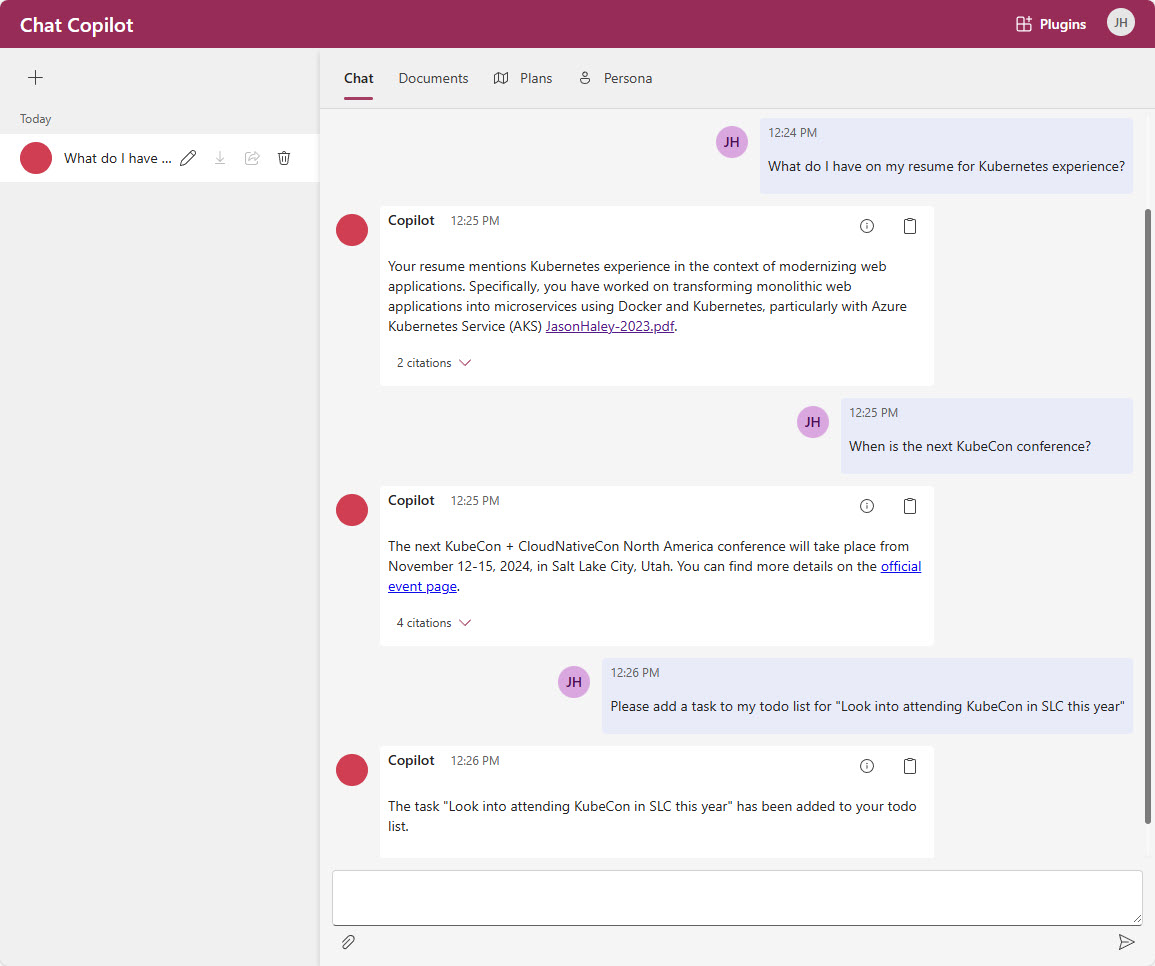
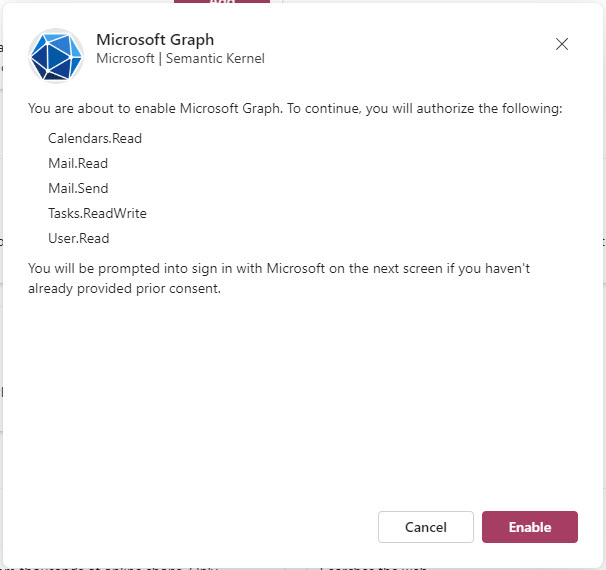
Microsoft Graph plugin
Once you have the authentication configured you’ll find this plugin pretty powerful. It can read your calendar, read your email, send email, add and remove items from you todo list and read user information.
WebSearcher plugin
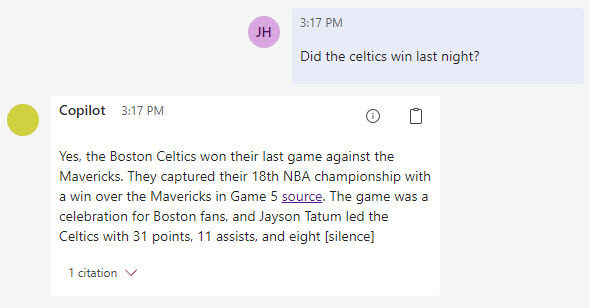
A couple of weeks ago I wrote a blog entry: WebSearchEnginePlugin about how useful it is and the API calls made back and forth when using it. When you deploy this application to Azure it will create and configure the Bing resource for you. This plugin gives the application the ability to do a Bing search when the LLM thinks it should.
With the WebSearcher plugin enabled, I can ask about recent events and get answers back - just like you can with Bing or these days with OpenAI chat’s website:
How I got it up and running
There are instructions on how to get it running locally and how to Deploy Chat Copilot to Azure as a web app service in Microsoft Learn. I personally followed the Instructions on the github readme. Once I got it running locally and played around with it for awhile, I then completed the optional memory pipeline and enabled backend authentication via Azure AD.
Below are the steps I took to deploy it in Azure.
This demo app does not use the Azure Developer CLI, so like the last demo I reviewed - we have to go old school and use the Azure CLI and PowerShell 7.
NOTE: If you haven’t already, you will need to be approved for the Azure OpenAI services on your Azure subscription before getting it up and running. Apply Here - it usually takes around 24 hours to get approved. Otherwise you’ll need to change your steps to use OpenAI directly.
- Clone the repo to your local drive
If you don’t have yarn installed, you’ll need to install it.
- Open the chat-copilot directory in Visual Studio Code as administrator, right click on the
scriptsdirectory and select Open in Integrated Terminal. Check to make sure it is a pwsh terminal.
Run .\Install.ps1
This will install the minimal dependencies, though if you don’t have .NET 8 installed there may be an issue since it was just upgraded to .NET 8 recently and it looks like th dotnet-7.0-sdk is still in then Install.ps1 script as of 6/19/2024.
- You’ll need your Azure subscription id for the script below which will manually create your Azure OpenAI resource and deployments (I ran each line one by one):
$SubscriptionId='<subscription id>'
$ResourceGroupName='rg-chat-copilot'
$Location='eastus'
$ResourceName='aoai-chat-copilot'

# Create the resource group to use
az group create --name $ResourceGroupName --location $Location --subscription $SubscriptionId

# Create the Azure OpenAI resource
az cognitiveservices account create --name  $ResourceName --resource-group $ResourceGroupName --location $Location --kind OpenAI --sku s0 --subscription $SubscriptionId

# Create the embedding deployment
az cognitiveservices account deployment create --name $ResourceName --resource-group  $ResourceGroupName --deployment-name text-embedding-ada-002 --model-name text-embedding-ada-002 --model-version "2" --model-format OpenAI --sku-capacity "1" --sku-name "Standard"

# Create the LLM deployment
az cognitiveservices account deployment create --name $ResourceName --resource-group  $ResourceGroupName --deployment-name gpt-4o --model-name gpt-4o --model-version "2024-05-13" --model-format OpenAI --sku-capacity "1" --sku-name "Standard"

# Get the endpoint uri
az cognitiveservices account show --name $ResourceName --resource-group  $ResourceGroupName --query "properties.endpoint"

# Get the api key
az cognitiveservices account keys list --name $ResourceName --resource-group  $ResourceGroupName --query "key1"
NOTE: I used a ChatGPT 4o model, but you can change it to use something else.
Of course, you could also do create the above resources in the Azure Portal if you like.
Keep the endpoint and key1 values handy, you’ll need them after getting the authentication stuff setup.
Now we skip to the Azure AD/Entra ID setup to get the prerequisites created. A lot of the steps below are taken from those instructions, I just added some screen shots to help.
- In the portal, go to your Azure AD/Entra ID resource and grab your TenantId
- Expand Manage and select App registrations and then the + New registration button in left corner.
Fill out the highlighted values for your application’s front end:
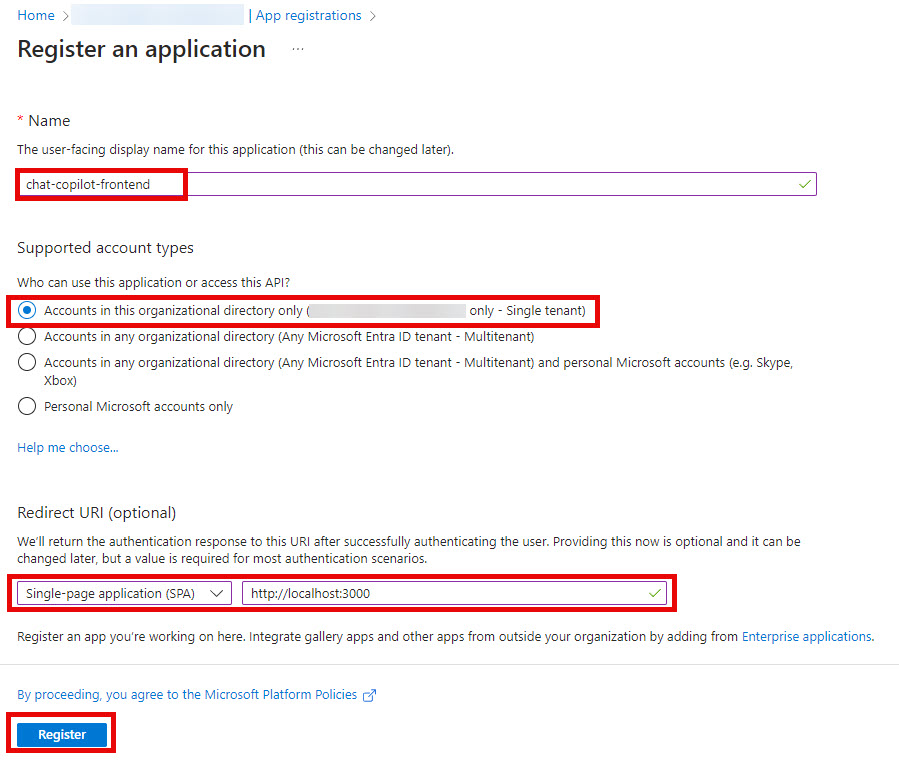
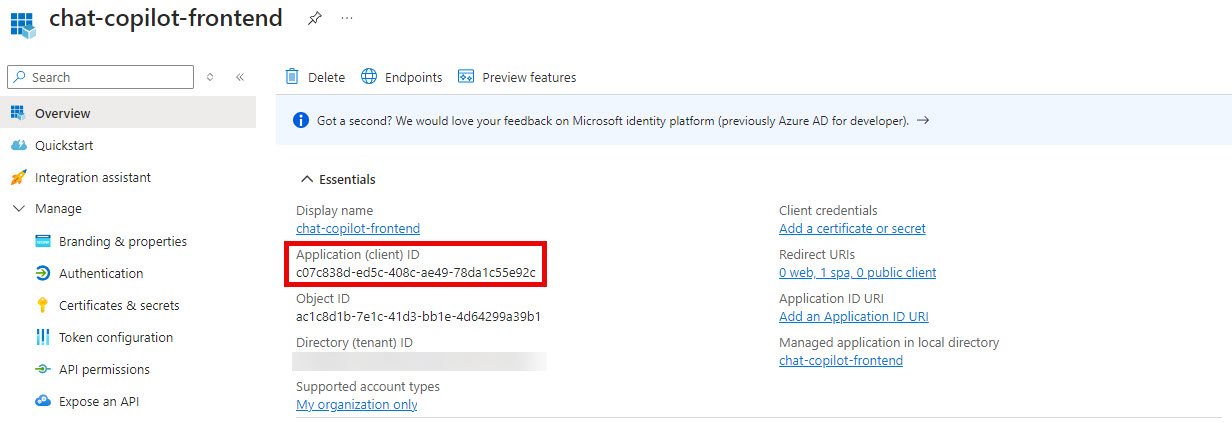
- Grab the Application (client) ID
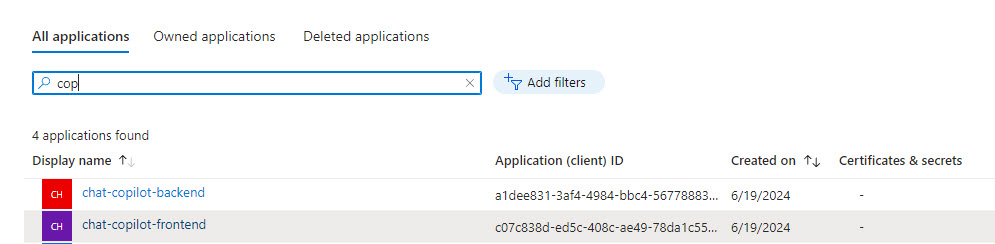
- Go back to App registrations and then the + New registration button in left corner to create a second registration.
Fill out the highlighted values for your application’s back end:
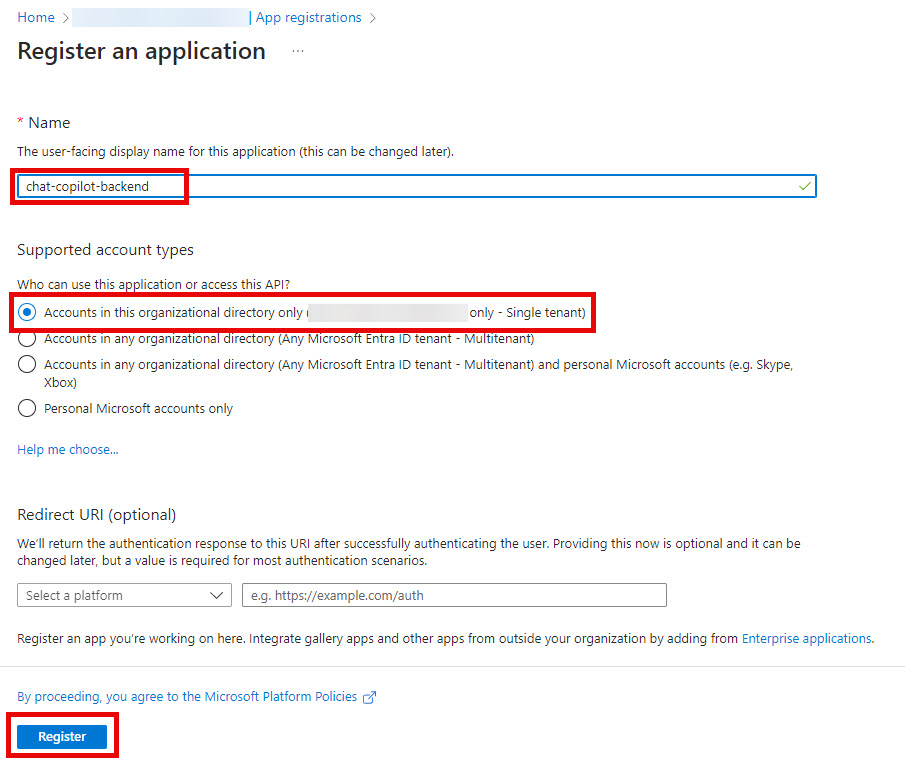
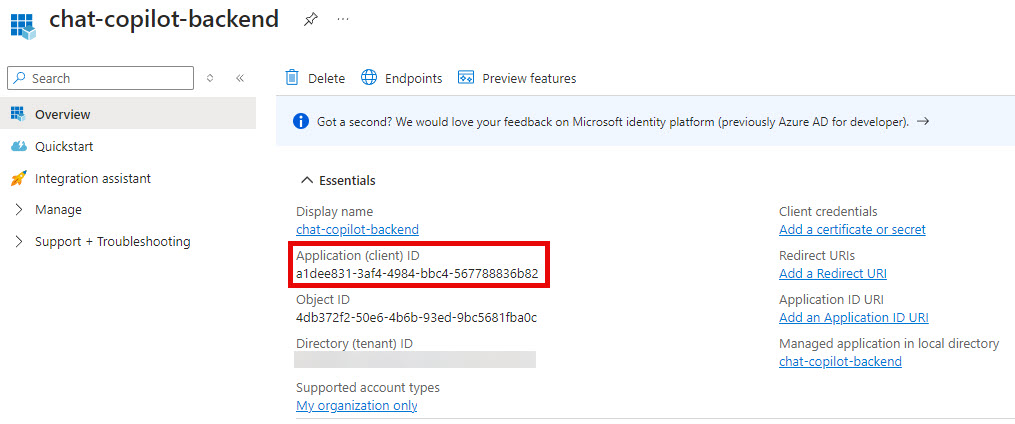
- Grab the Application (client) ID
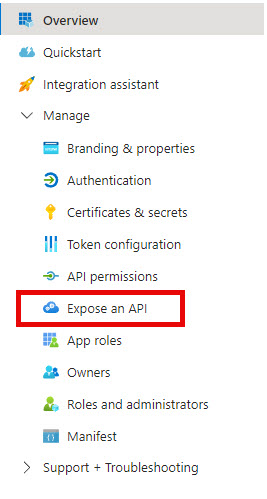
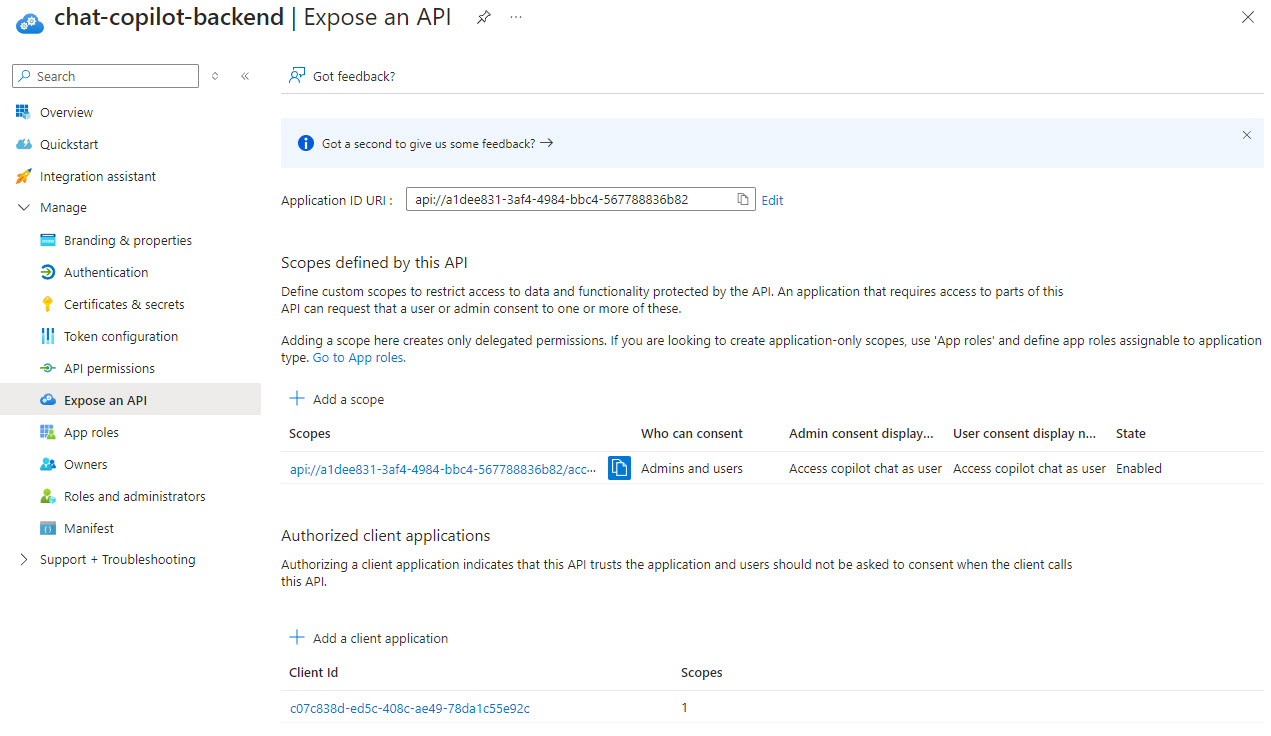
- Expand Manage in the menu if it isn’t and select Expose an API
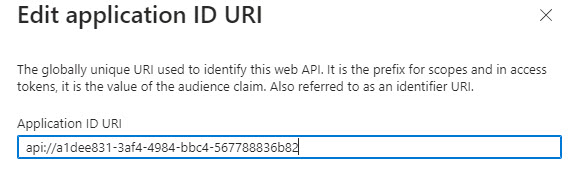
- Add an Application ID URI, the value should be pre-populated. Click Save.
- Add a scope for
access_as_user, click Add Scope and fill in the following values:

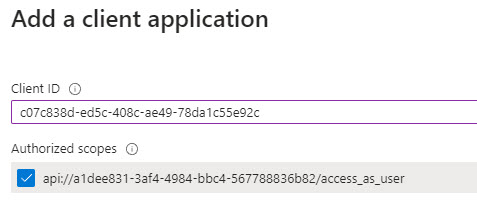
- Add the web app frontend as an authorized client application, click Add a client application, add your front end client ID (from #6 above) and check the authorized scope:
Your chat-copilot-backend should look similar to this when done:
- Now go back to App Registrations and lookup your frontend registration and select it.
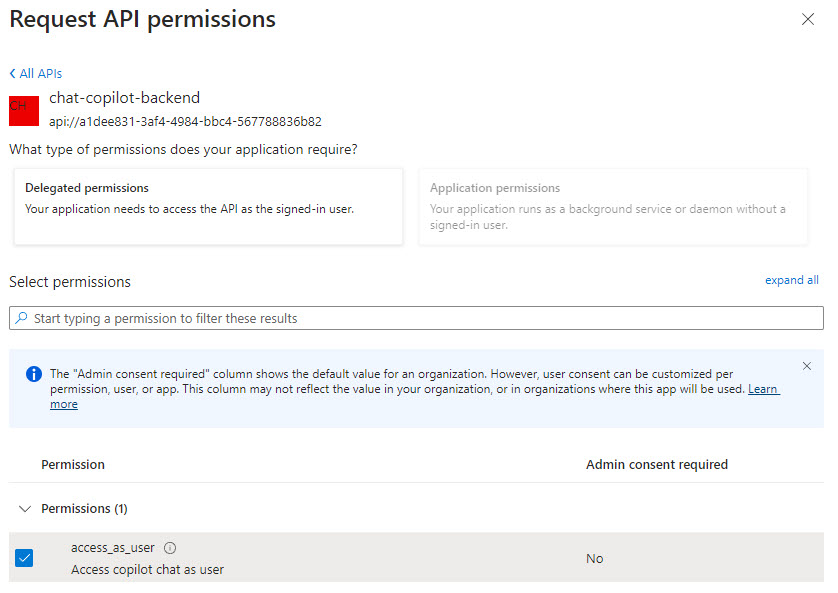
- Select API Permissions on the menu and click Add a permission, select the APIs my organization uses and search for your backend app and select it
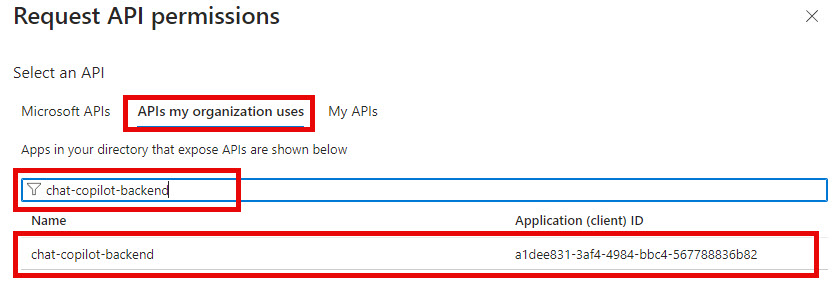
- Select permissions
access_as_userand click Add permissions
-
In Visual Studio code’s terminal window you used for step 3 above, run
cd deployto change to the deployment scripts directory and open the deploy-azure.ps1 script. -
Change line 51 to the region your resource group is created in from step 8 (mine is eastus), save the file once done.
$Region = "eastus",
- Gather the following settings:
| Setting | Description |
|---|---|
| AI_SERVICE | this was AzureOpenAI for me (other option is OpenAI) |
| API_KEY | from the Azure OpenAI resource (in step 3 above) |
| AZURE_OPENAI_ENDPOINT | also from step 3 above) |
| FRONTEND_APPLICATION_ID | Client ID from step 6 above |
| BACKEND_APPLICATION_ID | Client ID from step 8 above |
| TENENT_ID | from step 4 above |
| AZURE_AD_INSTANCE | should be https://login.microsoftonline.com |
| SUBSCRIPTION_ID | from step 3 above |
- Plug all the above values into this script and run it:
.\deploy-azure.ps1 -Subscription {SUBSCRIPTION_ID} -DeploymentName chat-copilot -AIService {AI_SERVICE} -AIApiKey {API_KEY} -AIEndpoint {AZURE_OPENAI_ENDPOINT} -BackendClientId {BACKEND_APPLICATION_ID} -FrontendClientId {FRONTEND_APPLICATION_ID} -TenantId {TENENT_ID} -DeployWebSearcherPlugin
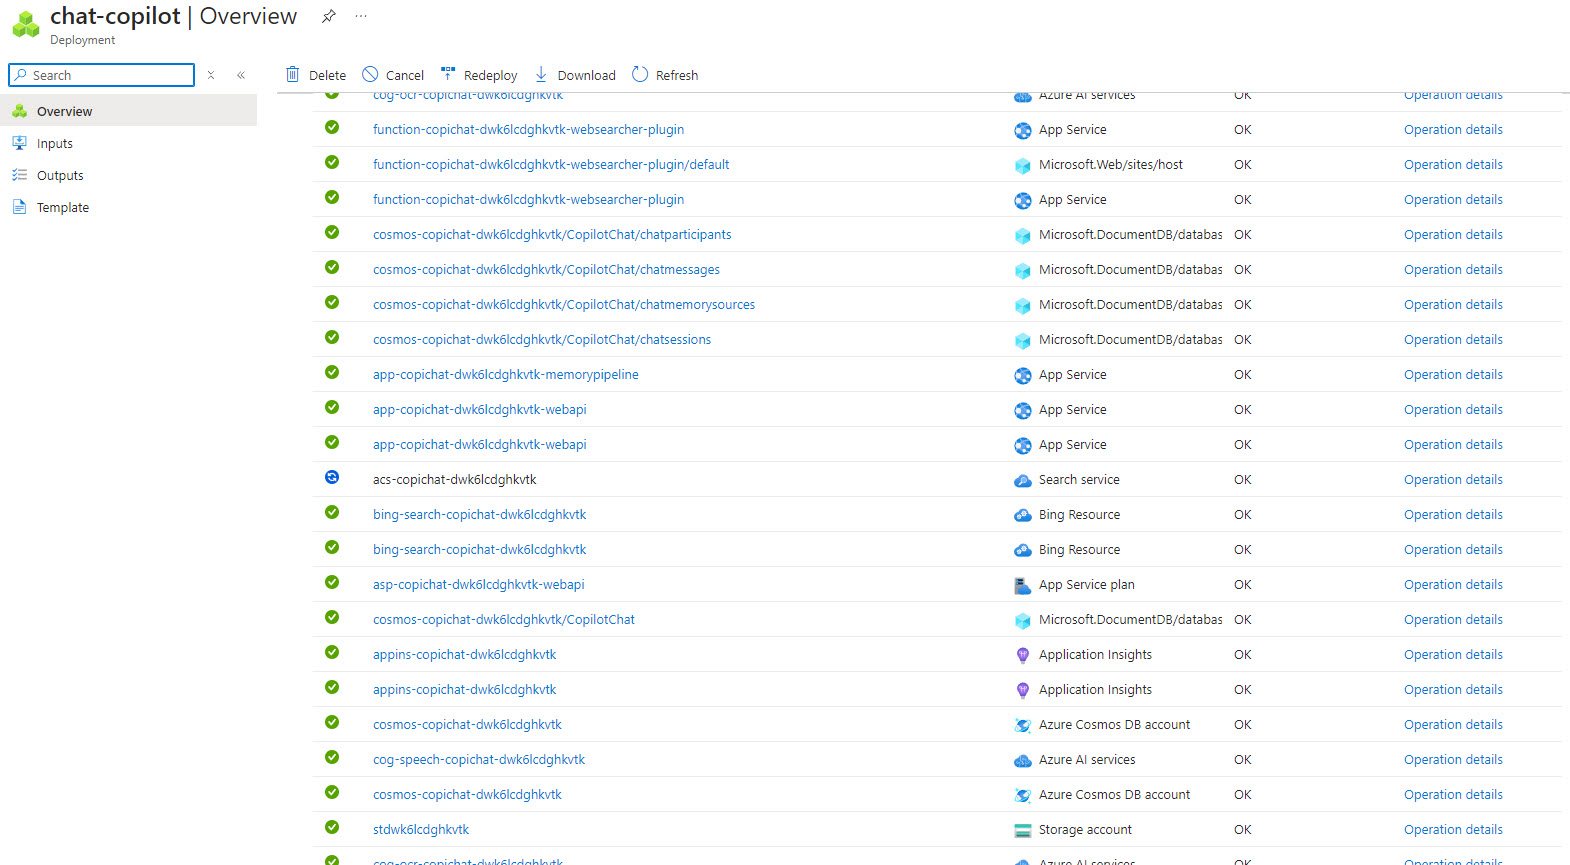
- Paste the filled out version of step 19 with all your values into the Visual Studio Code’s terminal and run it. This will take awhile to create all the Azure resources.
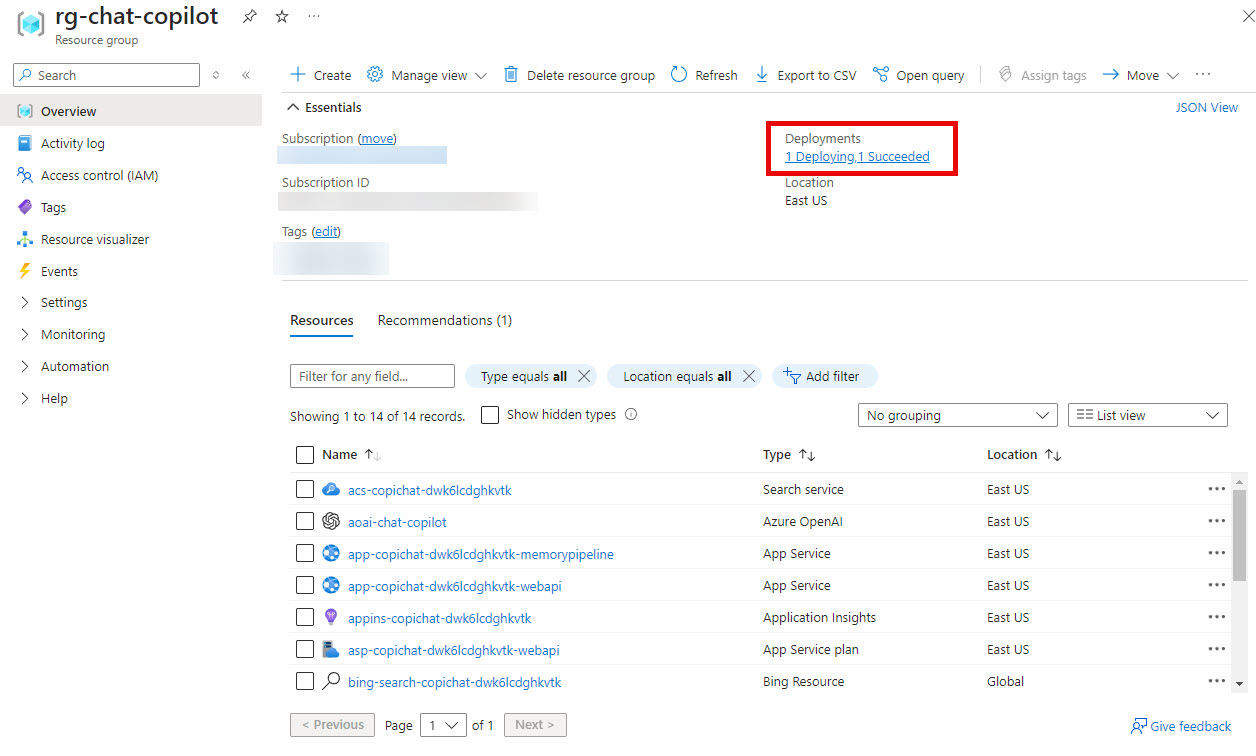
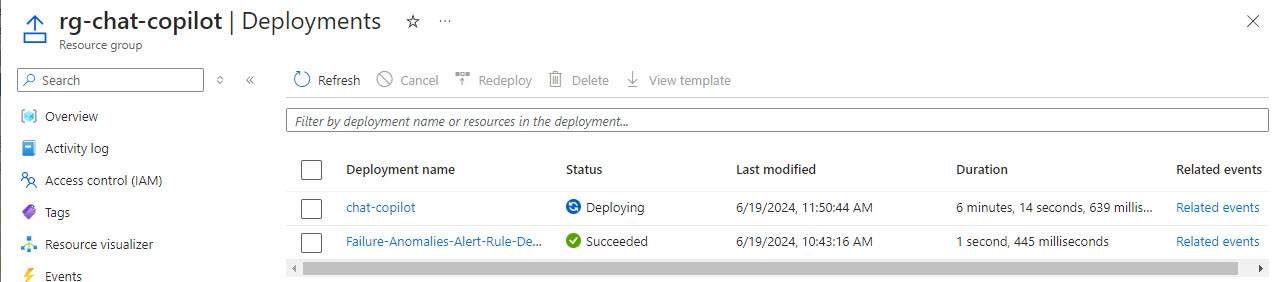
NOTE: If one of the resources fail to deploy, you can delete the deployment in the portal an rerun the script. Also, if it gets “stuck” you can cancel and rerun as well. I had to cancel and rerun due to either CosmosDB or Search Service getting stuck in deploying status.
You can get to the deployments from the resource group in the portal:
While the Azure resources are being spun up, I then opened a PowerShell 7 terminal as an administrator and changed to the .\scripts\deploy directory.
- Open the package-webapi.ps1 and change line 13 in order to have it built as .NET 8 and save the change.
    [string]
    # .NET framework to publish.
    $DotNetFramework = "net8.0",
-
Run
.\package-webapi.ps1 -
Open package-memorypipeline.ps1 and change line 13 in order to have it built as .NET 8 and save the change.
    [string]
    # .NET framework to publish.
    $DotNetFramework = "net8.0",
- Run
.\package-memorypipeline.ps1
I didn’t have any luck packaging the plugins - too many things were package in the zip, so I had to do it manually.
-
Open the
CopilotChat.slnin Visual Studio and right click on the WebSearcher project, choose Publish…. -
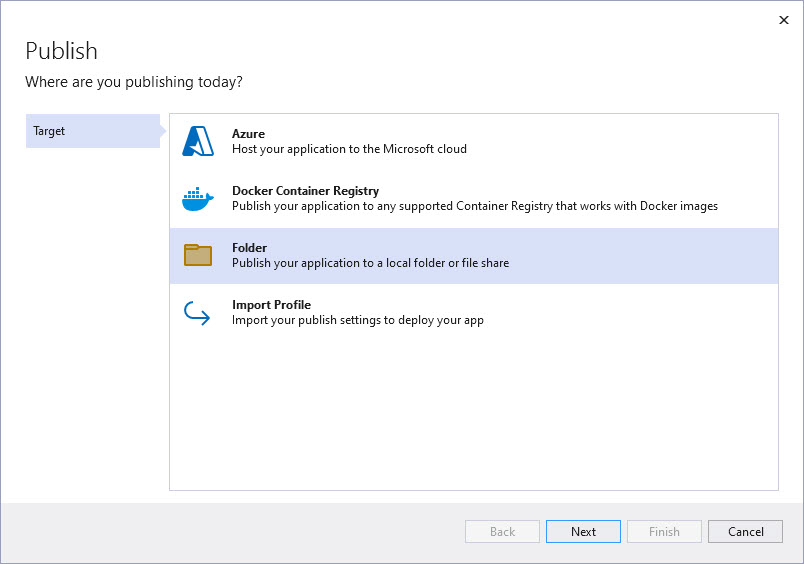
Click New Profile and then select Folder in the wizard and click Next.
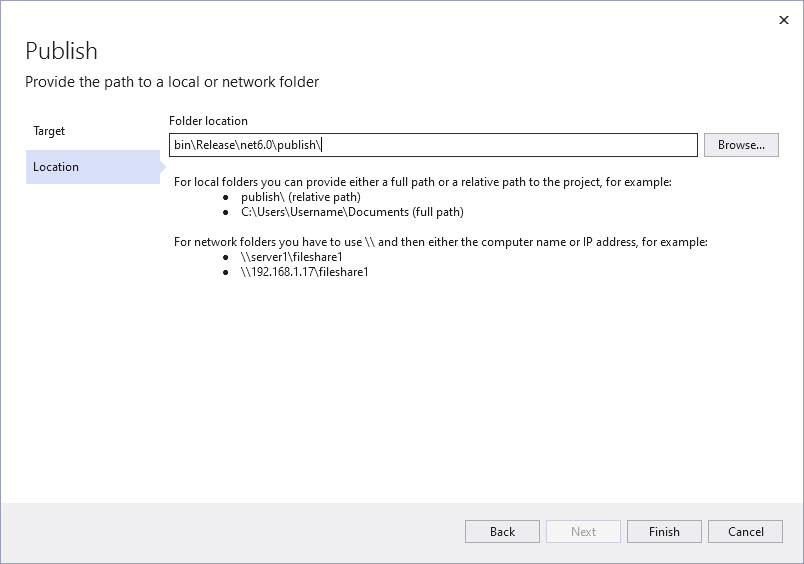
- Select where you want the files to go and click Next
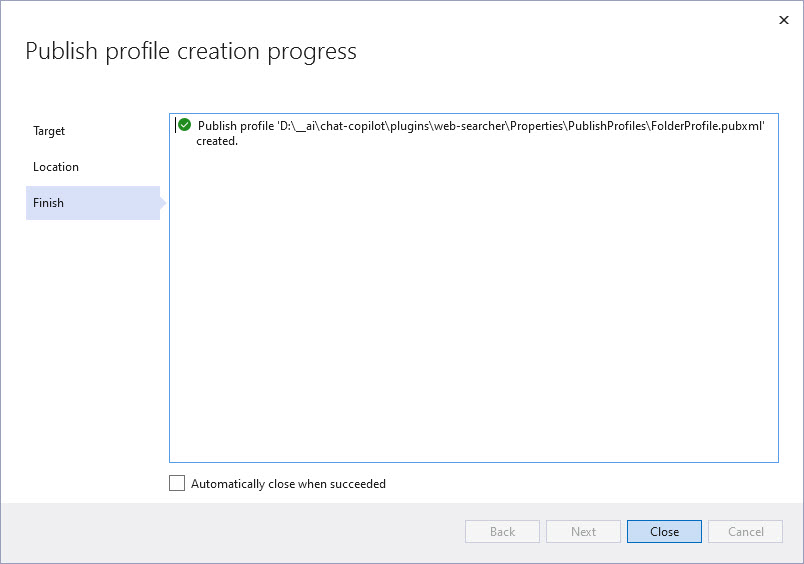
- Click Close to finish the wizard.
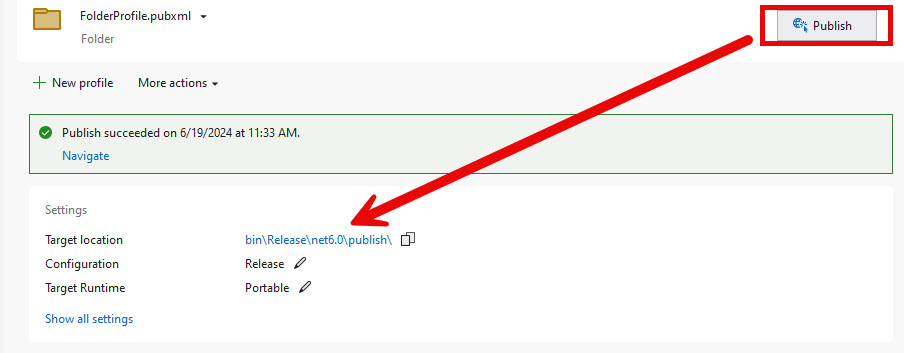
- Click the Publish button. Once it is complete, click on the link to the directory to open the directory.
-
When the explorer opens, go up one level and zip the publish folder (right click -> send to -> compressed zipped folder).
-
Rename publish.zip to websearcher.zip. Copy or cut the zip file and put it in the ./script/deploy/out/plugins folder
-
Replace your subscription and resource group name in the following script and run it to deploy the web app:
.\deploy-webapi.ps1 -Subscription {SUBSCRIPTION_ID} -ResourceGroupName {RESOURCE_GROUP_NAME} -DeploymentName chat-copilot
- Replace your subscription and resource group name in the following script and run it to deploy the websearcher function:
.\deploy-plugins.ps1 -Subscription {SUBSCRIPTION_ID} -ResourceGroupName {RESOURCE_GROUP_NAME} -DeploymentName chat-copilot
- Replace your subscription and resource group name in the following script and run it to deploy the memory pipeline web app:
.\deploy-memorypipeline.ps1 -Subscription {SUBSCRIPTION_ID} -ResourceGroupName {RESOURCE_GROUP_NAME} -DeploymentName chat-copilot
- If you deployed a gpt-4o model in step 3, you’ll need to modify the Environment Variable on the webapi web app. Open the web app in the Azure portal, expand the Settings section in the menu, select Environment variables, the find the
KernelMemory:Services:AzureOpenAIText:Deploymentin the Advanced edit or in the UI and change it. Don’t forget to click Apply and Confirm once you have made the change.
    "name": "KernelMemory:Services:AzureOpenAIText:Deployment",
    "value": "gpt-4o",
    "slotSetting": false
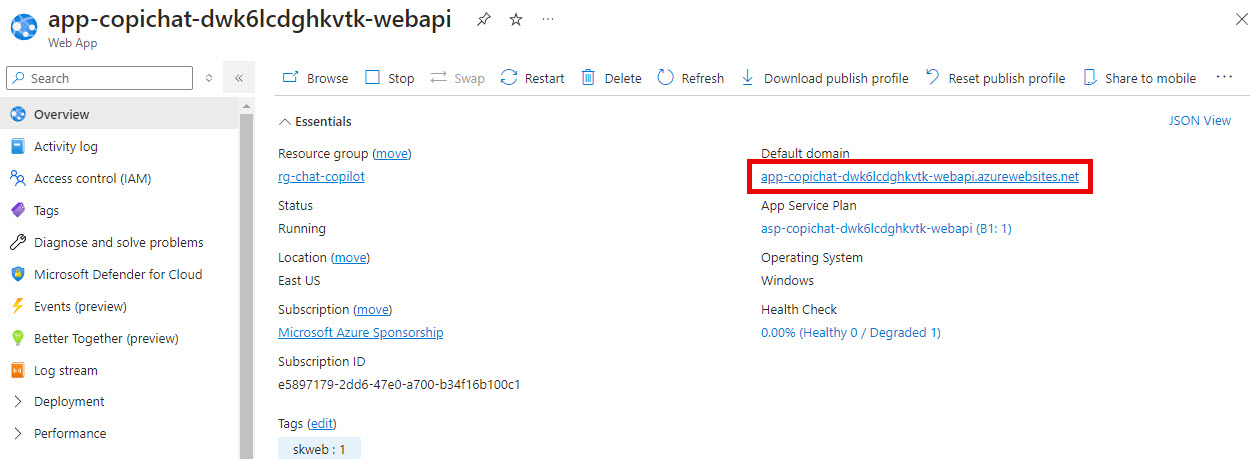
- Open the web app and locate the Default domain in the right corner of the Overview pane and click on the link to open the application. The first load will take a minute.
Once it loads you should see the login page
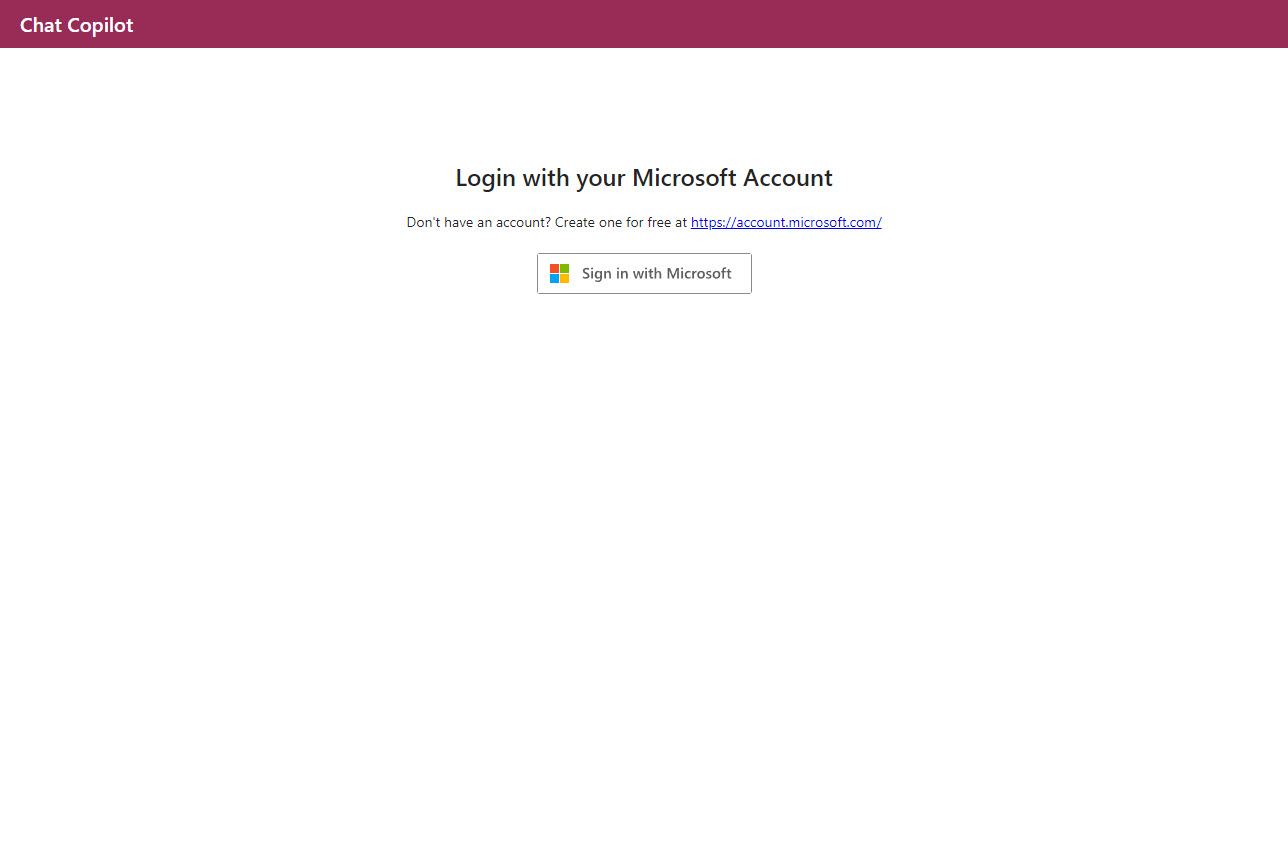
- Accept the dialog and you should be good to go.
Points of Interest
These are some points in the demo that are RAG feature related and you may revisit later when you start creating your own RAG applications.
Storing vector embeddings in Azure AI Search
This demo app uses Azure AI Search when deployed to Azure and local files in the /tmp directory when running locally to store document chunks and their embeddings. This feature is completely provide by Kernel Memory.
Storing chat conversations in database
This demo stores the chat conversation history in CosmosDB. This is a useful feature that we’ve see in a previous demo review.
Strategy for optimizing prompt size
When you start to use history or memory in your application, you may quickly find out that optimizing the contents of the prompt can be tricky.
The GetAllowedChatHistoryAsync method in ChatPlugin.cs is where the prompt is built keeping in mind the token limits - just before sending off to LLM.
Semantic Kernel usage
This demo is a reference application for using Semantic Kernel. I don’t know exactly how long this demo has been around, I think it was in the Semantic Kernel’s source repo at one point and moved out to its own. Since SK has changed a bit in the past year, you can tell this reference application has been around awhile and hasn’t been kept 100% up-to-date with the latest direction of SK - but that being said it is an awesome demo application.
Text chunking
This also is completely provided by Kernel Memory. However, you can configure the MaxTokensPerLine, MaxTokensPerParagraph and OverlappingTokens Kernel Memory will use in the appsettings file:
  "KernelMemory": {
      // other settings
      "ImageOcrType": "None",
      "TextPartitioning": {
        "MaxTokensPerLine": 300,
        "MaxTokensPerParagraph": 500,
        "OverlappingTokens":  100
      }
    }
NOTE: You will need to add the settings above if you wish to modify the defaults since they are not included out of the box.
The TextPartitioningOptions.cs shows the defaults are:
     /// <summary>
    /// The maximum number of tokens per paragraph.
    /// When partitioning a document, each partition usually contains one paragraph.
    /// </summary>
    public int MaxTokensPerParagraph { get; set; } = 1000;

    /// <summary>
    /// The maximum number of tokens per line, aka per sentence.
    /// When partitioning a block of text, the text will be split into sentences, that are then grouped into paragraphs.
    /// Note that this applies to any text format, including tables, code, chats, log files, etc.
    /// </summary>
    public int MaxTokensPerLine { get; set; } = 300;

    /// <summary>
    /// The number of overlapping tokens between paragraphs.
    /// </summary>
    public int OverlappingTokens { get; set; } = 100;
Other resources
- Chat Copilot: A reference application for Semantic Kernel
- Semantic Kernel - Chat Copilot Youtube Playlist
- Semantic Kernel Discord there is a #chat-copilot channel
- Semantic Kernel Documentation
If you have a comment, please message me @haleyjason on twitter/X.