Monday I posted my notes on this last month’s study topic of property graph RAG, which has the general information I’ve collected. In this entry I want to go through some code I created in a polyglot notebook (ie. a notebook that has C# code instead of python), when I was working through the steps needed for a property graph RAG application.
Related posts:
- Study Notes: Graph RAG - Property Graph RAG
- Study Notes: Graph RAG - Property Graph RAG (The Projects)
Where To Get The Code
The code for this entry is in my Github repo semantic-kernel-getting-started under the notebooks folder:
1_PropertyGraphRAG.ipynb - is my initial notebook for creating the steps needed for a property graph RAG app
2_PropertyGraphRAG.ipynb - has multiple changes that improve the final retrieval step and better use the additional information being added from the graph database.
A Quick Look at What It Does
The data used for the RAG application is a listing of blog post summaries that I have written this year.
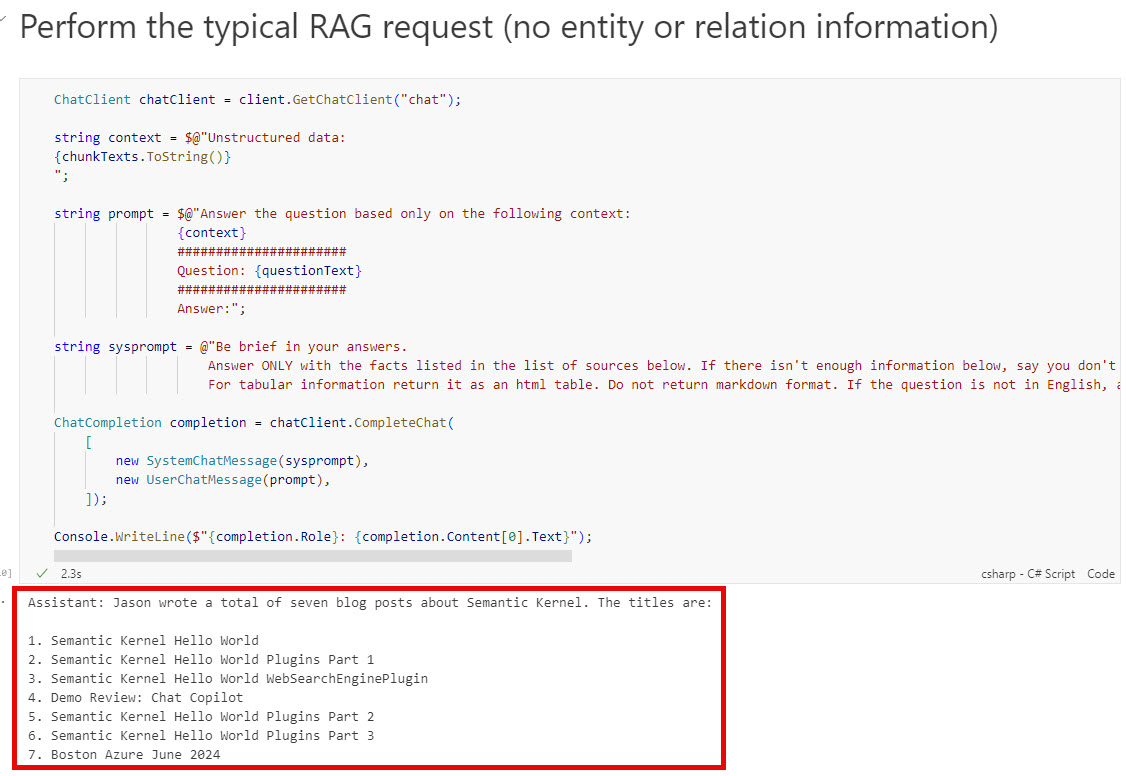
The goal is to get the system to answer a global knowledge question like: “How many blog posts did Jason write about Semantic Kernel and what are their titles?”. A RAG application that only does a vector similarity search and returns the top 5 blog summaries only knows about the subset of blogs in those summaries - so it can’t list all of them:
With the graph RAG adding entity relationships to the context passed to the LLM, it gets closer to the correct answer (though still isn’t 100% correct all the time).

The Code
There are three phases to this notebook:
- Setup
- Ingestion
- Retrieval
The notebook is written to run from the top down and does assume you have the resources and their environment variables setup before starting. If you have already done the ingestion and come back to the notebook at a later date, you will still need to run the Setup step (references, environment variables and Neo4j connection) and then you can jump to the Retrieval phase.
Setup
It is best to get the graph database and Azure OpenAI resources configured before starting with the notebook.
Neo4j
The Neo4j Installation page should have a link that provides you with a way to install Neo4j. I used the Neo4j Desktop, which I downloaded from their deployment center.
Azure Open AI
As of July 2024, you no longer need to fill out a form and request access to OpenAI models in Azure - this means it is now just another Azure resource.
If you need help getting an Azure OpenAI resource and the chat and embeddings model created, this page should help you.
NOTE: If there is interest, I’ll make the changes to be able to use an OpenAI account instead.
If you haven’t cloned the repo yet, first clone it to your local system.
Now that you have the above resources configured, running and the code downloaded, you’ll need to create a .env file for the notebook to use.
Find the /notebooks folder and create an .env in there. Then open the 2_PropertyGraphRAG.ipynb notebook in VS Code. You may need to install the ployglot notebooks extension first.
Put the following in the .env file, make sure you fill in your values:
AZURE_OPENAI_ENDPOINT="https://<aoai resource name>.openai.azure.com/"
AZURE_OPENAI_RESOURCE="<aoai resource name>"
AZURE_OPENAI_API_KEY="<aoai api key>"
AZURE_OPENAI_EMBEDDINGS_DEPLOYMENT="embedding"
AZURE_OPENAI_CHAT_DEPLOYMENT="chat"

NEO4J_URI="neo4j://localhost:7687"
NEO4J_USER="neo4j"
NEO4J_PASSWORD="neo4j"
NEO4J_DATABASE="neo4j",
NEO4J_VERSION="5"
Now you are ready to start running the notebook.
The first section after the Setup heading has all the references and using statements for the notebook.
#r "nuget: Azure.AI.OpenAI, *-*"
#r "nuget: Azure, *-*"
#r "nuget: Azure.Identity, *-*"
#r "nuget: dotenv.net, *-*"
#r "nuget: Microsoft.DotNet.Interactive.AIUtilities, *-*"
#r "nuget: Microsoft.ML.Tokenizers, *-*"
#r "nuget: Microsoft.SemanticKernel.Core, *-*"
#r "nuget: Neo4j.Driver, *-*"

using Microsoft.DotNet.Interactive;
using Microsoft.DotNet.Interactive.AIUtilities;
using dotenv.net;
using Azure.AI.OpenAI;
using Azure;
using Azure.Identity;
using OpenAI.Chat;
using System;
using System.Text.Json;
using System.Text.Json.Serialization;
using System.Text.RegularExpressions;
using System.IO;
using Microsoft.SemanticKernel.Text;
using Microsoft.ML.Tokenizers;
using Neo4j.Driver;
The next section loads the values in the .env file into environment variables to use for communicating with Azure OpenAI.
DotEnv.Load();

var envVars = DotEnv.Read();

AzureOpenAIClient client = new(new Uri(envVars["AZURE_OPENAI_ENDPOINT"]),
    new AzureKeyCredential(envVars["AZURE_OPENAI_API_KEY"]));

var embeddings = envVars["AZURE_OPENAI_EMBEDDINGS_DEPLOYMENT"];
var llm = envVars["AZURE_OPENAI_CHAT_DEPLOYMENT"];
One difference between the first notebook and the second is I moved the Neo4j connection to the setup. So the next thing to do is to verify you can connect to Neo4j and setup its variables:
IAuthToken token = AuthTokens.Basic(
                envVars["NEO4J_USER"],
                envVars["NEO4J_PASSWORD"]
            );
IDriver driver = GraphDatabase.Driver(envVars["NEO4J_URI"], token);

QueryConfig config = new QueryConfig();
Ingestion
The ingestion phase is broken up in to the following steps, which should allow for some experimentation with the different steps:
- Define the data structures used in extracting the entities and populating the Neo4j database
- Call the LLM to extract entities
- Process the results into a unique list of entities and their relationships
- Generate the cypher to populate Neo4j
- Populate the Neo4j database
- Create and populate vector and full text indexes
Define data structures
Here’s the code to create the data structures and utility methods:
public record DocunentMetadata(string id, string source);
public record ChunkMetadata(string id, string name, int sequence, string documentId, string text);
public record TripletRow(string head, string head_type, string relation, string tail, string tail_type);
public class EntityMetadata
{
    public string name { get; set; }
    public string type { get; set; }
    public string id { get; set; }
    public string text { get; set; }
    public Dictionary<string, ChunkMetadata> mentionedInChunks {get; set;} = new Dictionary<string, ChunkMetadata>();
}

public class Utilities
{
    public static EntityMetadata PopulateEntityMetadata(ChunkMetadata chunkMetadata, TripletRow triplet, EntityMetadata entityMetadata, bool isHead = true)
    {
        entityMetadata.id = Guid.NewGuid().ToString("N");

        if (isHead)
        {
            entityMetadata.name = CreateName(triplet.head);
            entityMetadata.type = triplet.head_type;
            entityMetadata.text = triplet.head;
        }
        else
        {
            entityMetadata.name = CreateName(triplet.tail);
            entityMetadata.type = triplet.tail_type;
            entityMetadata.text = triplet.tail;
        }

        entityMetadata.mentionedInChunks.Add(chunkMetadata.id, chunkMetadata);

        return entityMetadata;
    }

    public static string CreateName(string text)
    {
        if (string.IsNullOrEmpty(text))
            return text;

        // Split the text into words
        string[] words = text.Split(new[] { ' ', '-', '_' }, StringSplitOptions.RemoveEmptyEntries);

        StringBuilder nameText = new StringBuilder();

        foreach (string word in words)
        {
            // Capitalize the first letter and make the rest lowercase
            var lword = word;
            if (char.IsDigit(word[0]))
            {
                lword = "_" + word;
            }

            nameText.Append(lword.ToLower());
        }
        return Regex.Replace(nameText.ToString(), "[^a-zA-Z0-9_]", "");
    }

    public static List<string> SplitPlainTextOnEmptyLine(string[] lines)
    {
        List<string> allLines = new List<string>(lines);
        List<string> result = new List<string>();

        // Make sure there is an empty string as last line to split into paragraph
        var last = allLines.Last();
        if (last.Length > 0)
        {
            allLines.Add("");
        }

        StringBuilder paragraphBuilder = new StringBuilder();
        foreach (string input in allLines)
        {
            if (input.Length == 0)
            {
                result.Add(paragraphBuilder.ToString());
                paragraphBuilder.Clear();
            }
            paragraphBuilder.Append($"{input} ");
        }

        return result;
    }
}
Entity Extraction
This is the step that calls the LLM to extract entities and relationships that will be used to populate the graph database.
There were changes in this step between the first notebook and this one - all had to do with customizing the extraction to get better quality entities and relations. Some changes include:
- Changing the chunking to split on blog summary instead of token size
- Increased the triplet number to extract
- Add a preamble to the prompt for some customized text
- Cleaned up some of the examples in the prompt (also to fit the data better)
ChatClient chatClient = client.GetChatClient(llm);
string fileName = "data/summaries.txt";
string fileText = File.ReadAllText(fileName);

DocunentMetadata documentMetatdata = new (Guid.NewGuid().ToString("N"), fileName);

var simpleLines = File.ReadAllLines(documentMetatdata.source);
var paragraphs = Utilities.SplitPlainTextOnEmptyLine(simpleLines);

string entityTypes = "BLOG_POST,PRESENTATION,EVENT,ORGANIZATION,PERSON,PLACE,TECHNOLOGY,SOFTWARE_SYSTEM,REVIEW,ACTION";
string relationTypes = "WRITTEN_BY,PRESENTED_BY,PART_OF,LOCATED_IN,LIVES_IN,TRAVELED_TO";

Dictionary<ChunkMetadata, List<TripletRow>> chunks = new Dictionary<ChunkMetadata, List<TripletRow>>();
int maxTripletsPerChunk = 20;
string preamble = "The given text document contains blog entry summaries with a Title, Author, Posted On date, Topics and Summary. Make sure to add the WRITTEN_BY relationship for the author.";
for (int i = 0; i < paragraphs.Count; i++)
{
    string text = paragraphs[i];

    ChunkMetadata chunkMetadata = new (Guid.NewGuid().ToString("N"), $"DocumentChunk{i}", i, documentMetatdata.id, text);

	string prompt =  $@"Please extract up to {maxTripletsPerChunk} knowledge triplets from the provied text.
    {{$preamble}}
    Each triplet should be in the form of (head, relation, tail) with their respective types.
    ######################
    ONTOLOGY:
    Entity Types: {entityTypes}
    Relation Types: {relationTypes}

    Use these entity types and relation types as a starting point, introduce new types if necessary based on the context.

    GUIDELINES:
    - Output in JSON format: [{{""head"": """", ""head_type"": """", ""relation"": """", ""tail"": """", ""tail_type"": """"}}]
    - Use the full form for entities (ie., 'Artificial Intelligence' instead of 'AI')
    - Keep entities and relation names concise (3-5 words max)
    - Break down complex phrases into multiple triplets
    - Ensure the knowledge graph is coherent and easily understandable
    ######################
    EXAMPLE:
    Text: Jason Haley, chief engineer of Jason Haley Consulting, wrote a new blog post titled 'Study Notes: GraphRAG - Property Graphs' about creating a property graph RAG system using Semantic Kernel.
    Output:
    [{{""head"": ""Jason Haley"", ""head_type"": ""PERSON"", ""relation"": ""WORKS_FOR"", ""tail"": ""Jason Haley Consulting"", ""tail_type"": ""COMPANY""}},
    {{""head"": ""Study Notes: GraphRAG - Property Grids"", ""head_type"": ""BLOG_POST"", ""relation"": ""WRITTEN_BY"", ""tail"": ""Jason Haley"", ""tail_type"": ""PERSON""}},
    {{""head"": ""Study Notes: GraphRAG - Property Grids"", ""head_type"": ""BLOG_POST"", ""relation"": ""TOPIC"", ""tail"": ""Semantic Kernel"", ""tail_type"": ""TECHNOLOGY""}},
    {{""head"": ""property grid RAG system"", ""head_type"": ""SOFTWARE_SYSTEM"", ""relation"": ""USES"", ""tail"": ""Semantic Kernel"", ""tail_type"": ""TECHNOLOGY""}}]
    ######################
    Text: {text}
    ######################
    Output:";

	ChatCompletion completion = chatClient.CompleteChat(
    	[
        	new UserChatMessage(prompt),
    	]);

	Console.WriteLine($"{completion.Role}: {completion.Content[0].Text}");
    List<TripletRow> rows =  JsonSerializer.Deserialize<List<TripletRow>>(completion.Content[0].Text.Replace("```json", "").Replace("```","").Replace("'", "").Trim());

    chunks.Add(chunkMetadata, rows);
}

Console.WriteLine($"Number of chunks: {chunks.Count}");
The code first loads the data/summaries.txt file and splits it into chunks of individual blog summaries.
The majority of the rest of the code is inside of the loop going through those chunks.
The prompt works, but would need some changes for different data files in order to get a better graph schema created.
Process the LLM results into unique list of entities
Next is the looping though the LLM results to build a unique EntityMetadata list.
Dictionary<string,EntityMetadata> entities = new Dictionary<string,EntityMetadata>();

foreach (ChunkMetadata key in chunks.Keys)
{
    List<TripletRow> triplets = chunks[key];
    foreach (var triplet in triplets)
    {
        EntityMetadata entity;
        string pcHead = Utilities.CreateName(triplet.head);
        if (entities.ContainsKey(pcHead))
        {
            entity = entities[pcHead];
            if (!entity.mentionedInChunks.ContainsKey(key.id))
            {
                entity.mentionedInChunks.Add(key.id, key);
            }
        }
        else
        {
            entity = new EntityMetadata();
            entities.Add(pcHead, Utilities.PopulateEntityMetadata(key, triplet, entity, true));
        }

        string pcTail = Utilities.CreateName(triplet.tail);
        if (entities.ContainsKey(pcTail))
        {
            entity = entities[pcTail];
            if (!entity.mentionedInChunks.ContainsKey(key.id))
            {
                entity.mentionedInChunks.Add(key.id, key);
            }
        }
        else
        {
            entity = new EntityMetadata();
            entities.Add(pcTail, Utilities.PopulateEntityMetadata(key, triplet, entity, false));
        }
    }
}

Console.WriteLine($"Unique entity count: {entities.Count}");
Next is the creation of the cypher text to use with Neo4j to populate the graph. The entities will look something like:
DOCUMENT
DOCUMENT_CHUNK
DOCUMENT-[:CONTAINS]->DOCUMENT_CHUNK
ENTITY
ENTITY-[:MENTIONED_IN]->DOCUMENT_CHUNK
DOCUMENT_CHUNK-[:MENTIONS]-ENTITY
...
Generate the cypher
This next code section creates the entities and relations cypher needed to populate the graph db.
List<string> entityCypherText = new List<string>(); // Document, DocumentChunk and Entity

entityCypherText.Add($"MERGE (Document1:DOCUMENT {{ id: '{documentMetatdata.id}', name:'Document1', type:'DOCUMENT', source: '{documentMetatdata.source}'}})");

foreach (var chunk in chunks.Keys)
{
    entityCypherText.Add($"MERGE (DocumentChunk{chunk.sequence}:DOCUMENT_CHUNK {{ id: '{chunk.id}', name: '{chunk.name}', type: 'DOCUMENT_CHUNK', documentId: '{chunk.documentId}', sequence: '{chunk.sequence}', text: \"{chunk.text.Replace("\"", "'")}\"}})");
    entityCypherText.Add($"MERGE (Document1)-[:CONTAINS]->(DocumentChunk{chunk.sequence})");
}

HashSet<string> types = new HashSet<string>();
foreach(var entity in entities.Keys)
{
    var labels = entities[entity];
    var pcEntity = entity;

    // Handle strange issue when type is empty string
    if (string.IsNullOrEmpty(labels.type))
    {
        continue;
    }
    entityCypherText.Add($"MERGE ({pcEntity}:ENTITY {{ name: '{pcEntity}', type: '{labels.type}', id: '{labels.id}', text: '{labels.text}'}})");

    if (!types.Contains(labels.type))
    {
        types.Add(labels.type);
    }

    foreach(var key in labels.mentionedInChunks.Keys)
    {
        var documentChunk = labels.mentionedInChunks[key];
        entityCypherText.Add($"MERGE ({pcEntity})-[:MENTIONED_IN]->(DocumentChunk{documentChunk.sequence})");
    }
}

HashSet<string> relationships = new HashSet<string>();
foreach (ChunkMetadata key in chunks.Keys)
{
    List<TripletRow> triplets = chunks[key];
    foreach (var triplet in triplets)
    {
        var pcHead = Utilities.CreateName(triplet.head);
        var pcTail = Utilities.CreateName(triplet.tail);
        var relationName = triplet.relation.Replace(" ", "_").Replace("-","_");
        if (string.IsNullOrEmpty(relationName))
        {
            relationName = "RELATED_TO";
        }
        entityCypherText.Add($"MERGE ({pcHead})-[:{relationName}]->({pcTail})");

        string headRelationship = $"MERGE (DocumentChunk{key.sequence})-[:MENTIONS]->({pcHead})";
        if (!relationships.Contains(headRelationship))
        {
            relationships.Add(headRelationship);
            entityCypherText.Add(headRelationship);
        }

        string tailRelationship = $"MERGE (DocumentChunk{key.sequence})-[:MENTIONS]->({pcTail})";
        if (!relationships.Contains(tailRelationship))
        {
            relationships.Add(tailRelationship);
            entityCypherText.Add(tailRelationship);
        }
    }
}
There are some sections on the notebook that will output the details if you are looking to see exactly what the cypher is going to look like or what entity types were extracted.
Populate Neo4j
You already connected to Neo4j in the setup section, so now you need to run the generated cypher:
using (var session = driver.AsyncSession())
{
    StringBuilder all = new StringBuilder();
    all.AppendJoin(Environment.NewLine, entityCypherText.ToArray());
    await driver.ExecutableQuery(all.ToString()).WithConfig(config).ExecuteAsync();
}
This could take 2 - 4 minutes. If it takes much longer for the same data file included in this repo - you may want to kill it and start again.
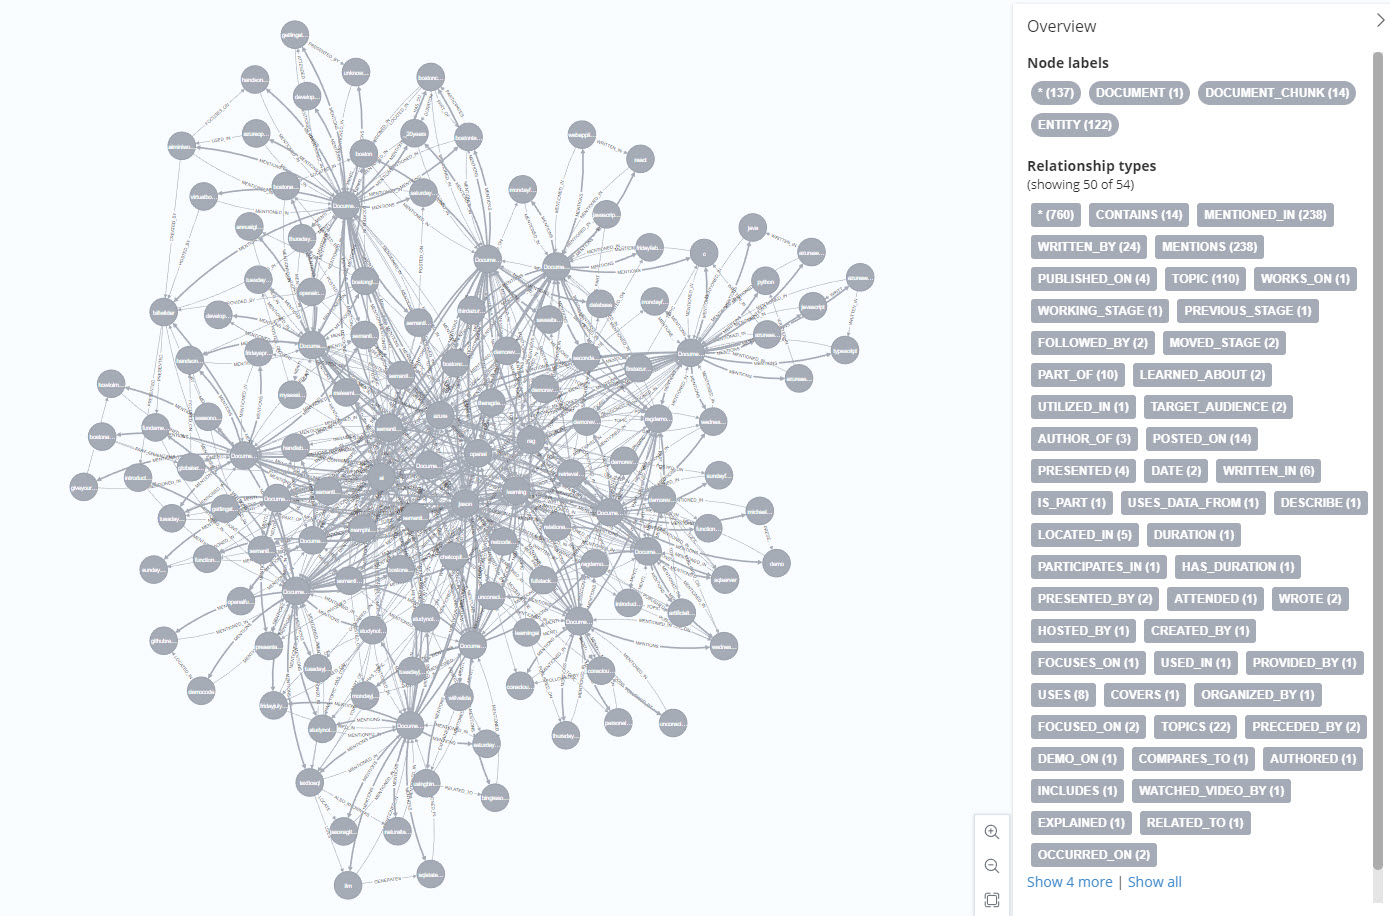
Now the nodes are in the database, you can run this command in the Neo4j Explorer to see the nodes and relations:
MATCH (n) RETURN (n)
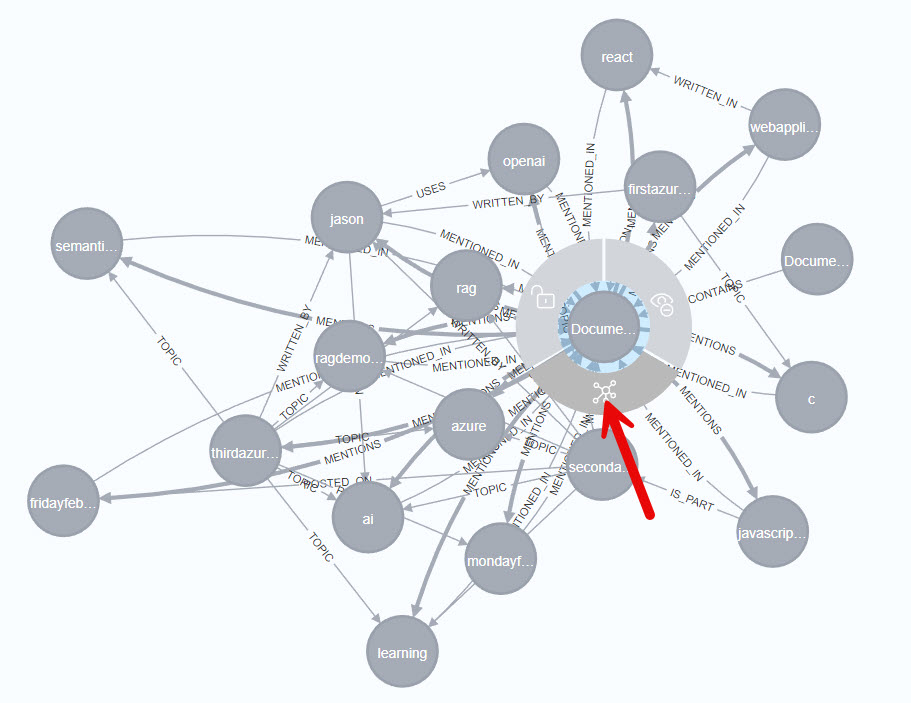
It’s initially pretty noisy, so looking at just 1 DocumentChunk is more useful:
MATCH (d:DOCUMENT_CHUNK WHERE d.name='DocumentChunk4') RETURN (d)
Then expand its related notes
Also, here are some cypher queries I’ve found useful (I’ve used the first two many times in the past month developing this code):
MATCH (n) RETURN (n)
MATCH (n) DETACH DELETE n
MATCH (n) RETURN count(n) as count
SHOW VECTOR INDEXES
SHOW VECTOR INDEXES YIELD name, type, entityType, labelsOrTypes, properties
MATCH (e1)-[r:WRITTEN_BY]->() RETURN (e1)
MATCH (d:ENTITY WHERE d.text='The RAG Demo Chronicles') RETURN (d)
Create and populate indexes
Next we need to add the vector index to provide the typical RAG functionality.
NOTE: in order to use the vector index you’ll need to install the GenAI plugin. Check out Neo4j’s GenAI integrations documentation to see how to do that
string createVectorIndex = @"CREATE VECTOR INDEX CHUNK_EMBEDDING IF NOT EXISTS
                            FOR (c:DOCUMENT_CHUNK) ON c.embedding
                            OPTIONS {indexConfig: {
                           `vector.dimensions`: 1536,
                            `vector.similarity_function`: 'cosine'
                            }}";

await driver.ExecutableQuery(createVectorIndex).WithConfig(config).ExecuteAsync();
Once the index is created we can populate it:
string populateEmbeddings = $@"
                            MATCH (n:DOCUMENT_CHUNK) WHERE n.text IS NOT NULL
                            WITH n, genai.vector.encode(
                                n.text,
                                'AzureOpenAI',
                                {{
                                    token: $token,
                                    resource: $resource,
                                    deployment: $deployment
                                }}) AS vector
                            CALL db.create.setNodeVectorProperty(n, 'embedding', vector)
                            ";
await driver.ExecutableQuery(populateEmbeddings)
    .WithParameters(new() {
        {"token", envVars["AZURE_OPENAI_API_KEY"]},
        {"resource", envVars["AZURE_OPENAI_RESOURCE"]},
        {"deployment", envVars["AZURE_OPENAI_EMBEDDINGS_DEPLOYMENT"]}})
    .WithConfig(config)
    .ExecuteAsync();
Another difference from the first notebook: add a vector index to the entity text:
string createEntityVectorIndex = @"CREATE VECTOR INDEX TEXT_EMBEDDING IF NOT EXISTS
                                    FOR (e:ENTITY) ON e.embedding
                                    OPTIONS {indexConfig: {
                                        `vector.dimensions`: 1536,
                                        `vector.similarity_function`: 'cosine'
                                    }}";

await driver.ExecutableQuery(createEntityVectorIndex).WithConfig(config).ExecuteAsync();
And populate it:
string populateEntittyEmbeddings = $@"
                            MATCH (n:ENTITY) WHERE n.text IS NOT NULL
                            WITH n, genai.vector.encode(
                                n.text,
                                'AzureOpenAI',
                                {{
                                    token: $token,
                                    resource: $resource,
                                    deployment: $deployment
                                }}) AS vector
                            CALL db.create.setNodeVectorProperty(n, 'embedding', vector)
                            ";
await driver.ExecutableQuery(populateEntittyEmbeddings)
    .WithParameters(new() {
        {"token", envVars["AZURE_OPENAI_API_KEY"]},
        {"resource", envVars["AZURE_OPENAI_RESOURCE"]},
        {"deployment", envVars["AZURE_OPENAI_EMBEDDINGS_DEPLOYMENT"]}})
    .WithConfig(config)
    .ExecuteAsync();
(Optional - not currently used in the retrieval): For the getting additional information when we are preforming graph RAG, we are using a full text index on the entity text field, so we need to create that:
string createFulltextIndex = @"CREATE FULLTEXT INDEX ENTITY_TEXT IF NOT EXISTS
                                FOR (n:ENTITY) ON EACH [n.text]";
await driver.ExecutableQuery(createFulltextIndex).WithConfig(config).ExecuteAsync();
That is it for the ingestion. Until you start doing some retrieval you won’t know for sure what the quality of your graph database is like.
Retrieval
Now is the fun part, making use of the graph!
For this notebook the property graph RAG flow is:
- Get user’s question
- Extract a keyword that sums up the user’s query (using LLM call)
- Perform a vector search on the graph’s entities for that keyword
- Get connected entities to any keyword match
- De-duplicate those entities
- Perform a vector similarity search on the document chunk data
- Use the above to create the context for the RAG system
- Build a prompt and call the LLM to get an answer to the user’s question
Question to answer:
string questionText = "How many blog post did Jason write about Semantic Kernel and what are their titles?";
Keyword Extractor
ChatClient chatClient = client.GetChatClient("chat");

int maxSynonyms = 10;
string prompt = $@"
Given a user question, pick or use 1 to 3 words to create a keyword to capture what the user is asking for'.

QUERY: {questionText}
######################
KEYWORDS:
";
ChatCompletion completion = chatClient.CompleteChat(
    [
        new UserChatMessage(prompt),
    ]);

Console.WriteLine($"{completion.Role}: {completion.Content[0].Text}");
Perform full text search on graph’s entities and return the related entities
Perform a vector search for the keywor on the entity text field:
string question = $@"
                    WITH genai.vector.encode(
                            $question,
                            'AzureOpenAI',
                            {{
                                token: $token,
                                resource: $resource,
                                deployment: $deployment
                            }}) AS question_embedding
                        CALL db.index.vector.queryNodes(
                            'TEXT_EMBEDDING',
                            $top_k,
                            question_embedding
                            )
                        YIELD node AS e1, score
                        MATCH (e1)-[r]-(e2:ENTITY)-[r2:MENTIONED_IN]->(dc)
                        RETURN '(' + COALESCE(e1.text,'') + ')-[:' + COALESCE(type(r),'') + ']->(' + COALESCE(e2.text,'') + ')' as triplet, dc.text as t, score
                    ";

var chunkResult = await driver.ExecutableQuery(question)
                .WithParameters(new() {
                    {"question", questionText},
                    {"token", envVars["AZURE_OPENAI_API_KEY"]},
                    {"resource", envVars["AZURE_OPENAI_RESOURCE"]},
                    {"deployment", envVars["AZURE_OPENAI_EMBEDDINGS_DEPLOYMENT"]},
                    {"top_k", 5}})
                .WithConfig(config)
                .ExecuteAsync();

var uniqueNodes = new HashSet<FulltextResult>();
if (chunkResult.Result.Count() > 0)
{
    foreach(var r in chunkResult.Result)
    {
        var tripletText = $"{r["triplet"]}";
        var fullTextResult = new FulltextResult(tripletText, Convert.ToDouble(r["score"]));
        if (!uniqueNodes.Contains(fullTextResult))
        {
            uniqueNodes.Add(fullTextResult);
            Console.WriteLine($"{fullTextResult.text} {fullTextResult.score}");
        }
    }
}
The above is the extra data we’ll be able to add to the context for the RAG call.
Perform a vector similarity search
string question = $@"
                    WITH genai.vector.encode(
                        $question,
                        'AzureOpenAI',
                        {{
                            token: $token,
                            resource: $resource,
                            deployment: $deployment
                        }}) AS question_embedding
                    CALL db.index.vector.queryNodes(
                        'CHUNK_EMBEDDING',
                        $top_k,
                        question_embedding
                        ) YIELD node AS chunk, score
                    RETURN chunk.id, chunk.text, score
                    ";

var chunkResult = await driver.ExecutableQuery(question)
                .WithParameters(new() {
                    {"question", questionText},
                    {"token", envVars["AZURE_OPENAI_API_KEY"]},
                    {"resource", envVars["AZURE_OPENAI_RESOURCE"]},
                    {"deployment", envVars["AZURE_OPENAI_EMBEDDINGS_DEPLOYMENT"]},
                    {"top_k", 5}})
                .WithConfig(config)
                .ExecuteAsync();
Try a typical RAG request
ChatClient chatClient = client.GetChatClient("chat");

string context = $@"Unstructured data:
{chunkTexts.ToString()}
";

string prompt = $@"Answer the question based only on the following context:
			    {context}
                ######################
                Question: {questionText}
                ######################
                Answer:";

string sysprompt = @"Be brief in your answers.
                    Answer ONLY with the facts listed in the list of sources below. If there isn't enough information below, say you don't know. Do not generate answers that don't use the sources below. If asking a clarifying question to the user would help, ask the question.
                    For tabular information return it as an html table. Do not return markdown format. If the question is not in English, answer in the language used in the question.";

ChatCompletion completion = chatClient.CompleteChat(
    [
        new SystemChatMessage(sysprompt),
        new UserChatMessage(prompt),
    ]);

Console.WriteLine($"{completion.Role}: {completion.Content[0].Text}");
The result usually returns 5 - 8 blog posts.
Try the graph RAG request
ChatClient chatClient = client.GetChatClient("chat");

string context = $@"
######################
Structured data:
{string.Join(Environment.NewLine, uniqueNodes.Select(c => c.text).Take(50).ToArray())}
######################
Unstructured data:
{chunkTexts.ToString()}
";

string prompt = $@"
To plan the response, begin by examining the Neo4j entity relations and their structured data to determine if the answer is present within. Follow these steps:

Analyze the provided Neo4j entity relations and their structured data:

Look at the nodes, relationships, and properties in the graph.
Identify the entities and their connections relevant to the question.
Identify relevant information:

Extract data points and relationships that are pertinent to the question.
Consider how these relationships influence the answer.
Synthesize the identified information:

Combine the extracted information logically.
Formulate a coherent and comprehensive response.
Here are some examples to guide the process:

######################
Example:
(Semantic Kernel)-[:TOPIC]->(Blog Post Title 1)
(Semantic Kernel)-[:HAS_TOPIC]->(Blog Post Title 2)
(Semantic Kernel)-[:INCLUDES_TOPIC]->(Blog Post Title 3)

Question:
What blog posts are about Semantic Kernel?

Answer:
Blog Post is about Semantic Kernel
######################
Answer the question based solely on the following context:
{context}

######################
Question: {questionText}
######################
Answer:";

string sysprompt = @"Answer ONLY with the facts listed in the list of sources below. If there isn't enough information below, say you don't know. Do not generate answers that don't use the sources below. If asking a clarifying question to the user would help, ask the question.
                    For tabular information return it as an html table. Do not return markdown format. If the question is not in English, answer in the language used in the question.";

ChatCompletion completion = chatClient.CompleteChat(
    [
        new SystemChatMessage(sysprompt),
        new UserChatMessage(prompt),
    ]);

Console.WriteLine($"{completion.Role}: {completion.Content[0].Text}");
This search is much better. It is not perfect though. Often times it does not return the full 13 items that are correct. So there is still work to be done - but it is much better than the first notebook version.
Conclusion
With this notebook you should have the raw materials for creating a property graph RAG application using Neo4j. The different steps should give you an opportunity to explore how it can be improved and see the detail of what makes a difference in the extracting of entities and relations and the calling of the LLM for the RAG request.
If you have a comment, please message me @haleyjason on twitter/X.